Difference between revisions of "AY Honors/Basic Sewing/Answer Key"
m (40 revisions: import with history from WB) |
m |
||
| (26 intermediate revisions by 4 users not shown) | |||
| Line 1: | Line 1: | ||
| − | {{ | + | {{HonorSubpage}} |
| − | + | <section begin="Body" /> | |
| − | + | {{ansreq|page={{#titleparts:{{PAGENAME}}|2|1}}|num=1}} | |
| + | <noinclude><translate><!--T:35--> | ||
| + | </noinclude> | ||
| + | <!-- 1. Describe the proper use of the following: --> | ||
| + | <noinclude></translate></noinclude> | ||
| + | {{ansreq|page={{#titleparts:{{PAGENAME}}|2|1}}|num=1a}} | ||
| + | <noinclude><translate><!--T:36--> | ||
| + | </noinclude> | ||
[[Image:Fingerhut.jpg|thumb|right|200px|Thimble]] | [[Image:Fingerhut.jpg|thumb|right|200px|Thimble]] | ||
| − | A thimble is a protective shield worn on the finger or thumb. It is used for pushing a needle through a piece of fabric in situations where the pressure applied to the needle would otherwise cause the needle to pierce the skin. | + | A thimble is a protective shield worn on the finger or thumb. It is used for pushing a needle through a piece of fabric in situations where the pressure applied to the needle would otherwise cause the needle to pierce the skin. A thimble is most usually made from metal, but can also be found made from leather, rubber, wood, glass or china. |
<br style="clear:both"/> | <br style="clear:both"/> | ||
| − | == | + | <!--T:37--> |
| + | <noinclude></translate></noinclude> | ||
| + | {{CloseReq}} <!-- 1a --> | ||
| + | {{ansreq|page={{#titleparts:{{PAGENAME}}|2|1}}|num=1b}} <!--T:3--> | ||
| + | <noinclude><translate><!--T:38--> | ||
| + | </noinclude> | ||
[[Image:Sewing_tape_measure.jpg|thumb|200px|right|Tape Measure]] | [[Image:Sewing_tape_measure.jpg|thumb|200px|right|Tape Measure]] | ||
| − | A cloth tape measure is used for measuring a person for the purpose of sizing a garment. | + | A cloth tape measure is used for measuring a person for the purpose of sizing a garment. It is also used to measure cloth. |
<br style="clear:both"/> | <br style="clear:both"/> | ||
| − | == | + | <!--T:39--> |
| + | <noinclude></translate></noinclude> | ||
| + | {{CloseReq}} <!-- 1b --> | ||
| + | {{ansreq|page={{#titleparts:{{PAGENAME}}|2|1}}|num=1c}} <!--T:4--> | ||
| + | <noinclude><translate><!--T:40--> | ||
| + | </noinclude> | ||
[[image:Schere_Gr_99.jpg|thumb|100px|right|Scissors]] | [[image:Schere_Gr_99.jpg|thumb|100px|right|Scissors]] | ||
| − | Scissors are | + | Scissors are generally multi-purpose and have similar small 'handles' with sharp blades that are riveted together. Scissors come in various sizes, quality and price ranges as well as with some design enhancements for specific tasks, such as for cutting hair, embroidery threads or crafts. You would use a pair of household scissors to cut parcel twine, paper, light card stock or food packages. Scissors are essential cutting tools and considered basic housewares. |
| + | |||
| + | <!--T:33--> | ||
| + | Shears on the other hand have a noticeable design difference - one side (or both) has a larger handle to accommodate a couple of fingers (thumb in the top and fingers in the bottom). The handles are often attached with an adjustable screw for precision cutting (especially dressmaker's shears). | ||
<br style="clear:both"/> | <br style="clear:both"/> | ||
| − | == | + | <!--T:41--> |
| + | <noinclude></translate></noinclude> | ||
| + | {{CloseReq}} <!-- 1c --> | ||
| + | {{ansreq|page={{#titleparts:{{PAGENAME}}|2|1}}|num=1d}} <!--T:5--> | ||
| + | <noinclude><translate><!--T:42--> | ||
| + | </noinclude> | ||
[[image:PinkingShears.jpg|thumb|200px|Pinking Shears]] | [[image:PinkingShears.jpg|thumb|200px|Pinking Shears]] | ||
Pinking shears are scissors whose blades are sawtooth instead of straight. Pinking shears will leave a zigzag pattern instead of a straight edge. | Pinking shears are scissors whose blades are sawtooth instead of straight. Pinking shears will leave a zigzag pattern instead of a straight edge. | ||
| + | <!--T:43--> | ||
Pinking shears are useful for cutting woven cloth. Cloth edges that are unfinished will easily fray, the weave becoming undone and threads pull out easily. The sawtooth pattern does not prevent the fraying but limits the length of the frayed thread and thus limits damage. | Pinking shears are useful for cutting woven cloth. Cloth edges that are unfinished will easily fray, the weave becoming undone and threads pull out easily. The sawtooth pattern does not prevent the fraying but limits the length of the frayed thread and thus limits damage. | ||
<br style="clear:both"/> | <br style="clear:both"/> | ||
| − | == | + | <noinclude></translate></noinclude> |
| + | {{CloseReq}} <!-- 1d --> | ||
| + | {{ansreq|page={{#titleparts:{{PAGENAME}}|2|1}}|num=1e}} <!--T:6--> | ||
| + | <noinclude><translate><!--T:44--> | ||
| + | </noinclude> | ||
[[Image:Needle storage.jpg|thumb|200px|Needles]] | [[Image:Needle storage.jpg|thumb|200px|Needles]] | ||
| − | Needles are used for piercing a fabric and passing a thread through it for the purpose of making a stitch. | + | Needles are used for piercing a fabric and passing a thread through it for the purpose of making a stitch. This can be done by hand or by machine. A hand needle has a hole in it (called the ''eye'') near its back. A machine needle has its eye near the point. |
<br style="clear:both"/> | <br style="clear:both"/> | ||
| − | ==2. Become acquainted with the sewing machine in your home or school. Identify:== | + | <!--T:45--> |
| − | + | <noinclude></translate></noinclude> | |
| + | {{CloseReq}} <!-- 1e --> | ||
| + | {{CloseReq}} <!-- 1 --> | ||
| + | {{ansreq|page={{#titleparts:{{PAGENAME}}|2|1}}|num=2}} | ||
| + | <noinclude><translate><!--T:46--> | ||
| + | </noinclude> | ||
| + | <!-- 2. Become acquainted with the sewing machine in your home or school. Identify: --> | ||
| + | <noinclude></translate></noinclude> | ||
| + | {{ansreq|page={{#titleparts:{{PAGENAME}}|2|1}}|num=2a}} | ||
| + | <noinclude><translate><!--T:47--> | ||
| + | </noinclude> | ||
[[Image:Sewing_machine_parts_a.png|thumb|300px|right|1: Balance Wheel; 2: Backspace lever]] | [[Image:Sewing_machine_parts_a.png|thumb|300px|right|1: Balance Wheel; 2: Backspace lever]] | ||
| − | The balance wheel provides a method of manually moving the needle up or down. | + | The balance wheel provides a method of manually moving the needle up or down. It is used to raise the needle out of the cloth when the stitch is finished, or to raise the thread take-up to make it accessible when threading the machine. |
<br style="clear:both"/> | <br style="clear:both"/> | ||
| − | == | + | <!--T:48--> |
| + | <noinclude></translate></noinclude> | ||
| + | {{CloseReq}} <!-- 2a --> | ||
| + | {{ansreq|page={{#titleparts:{{PAGENAME}}|2|1}}|num=2b}} <!--T:8--> | ||
| + | <noinclude><translate><!--T:49--> | ||
| + | </noinclude> | ||
[[Image:Thread_take-up.png|thumb|300px|right|Thread take-up]] | [[Image:Thread_take-up.png|thumb|300px|right|Thread take-up]] | ||
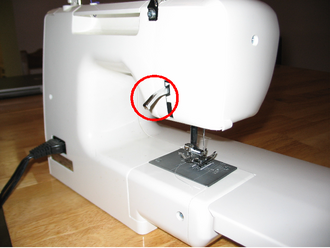
The thread take-up moves up and down with the needle, keeping the thread tight and drawing it from the spool as needed. | The thread take-up moves up and down with the needle, keeping the thread tight and drawing it from the spool as needed. | ||
<br style="clear:both"/> | <br style="clear:both"/> | ||
| − | == | + | <!--T:50--> |
| − | The presser foot holds the cloth in place while the needle runs thread through it. | + | <noinclude></translate></noinclude> |
| + | {{CloseReq}} <!-- 2b --> | ||
| + | {{ansreq|page={{#titleparts:{{PAGENAME}}|2|1}}|num=2c}} <!--T:9--> | ||
| + | <noinclude><translate><!--T:51--> | ||
| + | </noinclude> | ||
| + | The presser foot holds the cloth in place while the needle runs thread through it. See the photo below for its location. | ||
| − | == | + | <!--T:52--> |
| + | <noinclude></translate></noinclude> | ||
| + | {{CloseReq}} <!-- 2c --> | ||
| + | {{ansreq|page={{#titleparts:{{PAGENAME}}|2|1}}|num=2d}} <!--T:10--> | ||
| + | <noinclude><translate><!--T:53--> | ||
| + | </noinclude> | ||
[[Image:Presser_foot_lifter.png|thumb|right|300px|Presser foot lifter]] | [[Image:Presser_foot_lifter.png|thumb|right|300px|Presser foot lifter]] | ||
| − | The presser foot lifter raises and lowers the presser foot. | + | The presser foot lifter raises and lowers the presser foot. Raise it when you need to place a piece of cloth under the needle (and under the presser foot). |
<br style="clear:both"/> | <br style="clear:both"/> | ||
| − | == | + | <!--T:54--> |
| + | <noinclude></translate></noinclude> | ||
| + | {{CloseReq}} <!-- 2d --> | ||
| + | {{ansreq|page={{#titleparts:{{PAGENAME}}|2|1}}|num=2e}} <!--T:11--> | ||
| + | <noinclude><translate><!--T:55--> | ||
| + | </noinclude> | ||
[[Image:Sewing_machine_parts_b.png|thumb|right|300px|1: Needle, 2: Presser foot, 3: Feed dogs]] | [[Image:Sewing_machine_parts_b.png|thumb|right|300px|1: Needle, 2: Presser foot, 3: Feed dogs]] | ||
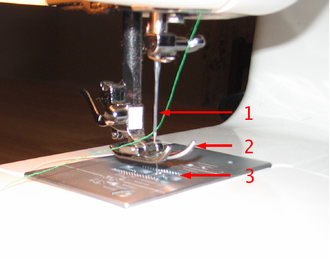
The needle stitches the thread (green in the photo) through the cloth. | The needle stitches the thread (green in the photo) through the cloth. | ||
| − | == | + | <!--T:56--> |
| − | The feed dogs are little tread-like pieces beneath the presser foot. | + | <noinclude></translate></noinclude> |
| + | {{CloseReq}} <!-- 2e --> | ||
| + | {{ansreq|page={{#titleparts:{{PAGENAME}}|2|1}}|num=2f}} <!--T:12--> | ||
| + | <noinclude><translate><!--T:57--> | ||
| + | </noinclude> | ||
| + | The feed dogs are little tread-like pieces beneath the presser foot. As the sewing machine is operated, the feed dogs advance the cloth forward (or backwards if the backspace lever is activated). The presser foot holds the cloth against the feed dogs so that they can move the cloth along. | ||
<br style="clear:both"/> | <br style="clear:both"/> | ||
| − | == | + | <!--T:58--> |
| + | <noinclude></translate></noinclude> | ||
| + | {{CloseReq}} <!-- 2f --> | ||
| + | {{ansreq|page={{#titleparts:{{PAGENAME}}|2|1}}|num=2g}} <!--T:13--> | ||
| + | <noinclude><translate><!--T:59--> | ||
| + | </noinclude> | ||
[[Image:Sewing_machine_bobbin.png|thumb|right|300px|Bobbin]] | [[Image:Sewing_machine_bobbin.png|thumb|right|300px|Bobbin]] | ||
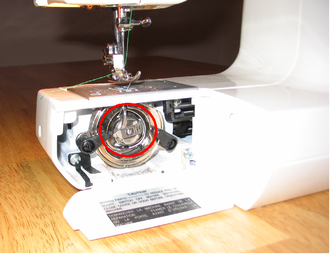
| − | The bobbin supplies a second spool of thread. | + | The bobbin supplies a second spool of thread. Between the bobbin and the needle, two pieces of thread are tied into a knot forming the stitch. The bobbin can be filled with thread by removing it from the position shown and placing it in a mechanism on the top of the sewing machine. It is usually filled with the same color thread as is thread through the needle. The bobbin's thread comes up from the bottom of the machine through a plate between the feed dogs. |
<br style="clear:both"/> | <br style="clear:both"/> | ||
| − | == | + | <!--T:60--> |
| + | <noinclude></translate></noinclude> | ||
| + | {{CloseReq}} <!-- 2g --> | ||
| + | {{ansreq|page={{#titleparts:{{PAGENAME}}|2|1}}|num=2h}} <!--T:14--> | ||
| + | <noinclude><translate><!--T:61--> | ||
| + | </noinclude> | ||
[[Image:Sewing_machine_control_pedal.jpg|thumb|300px|right|Control]] | [[Image:Sewing_machine_control_pedal.jpg|thumb|300px|right|Control]] | ||
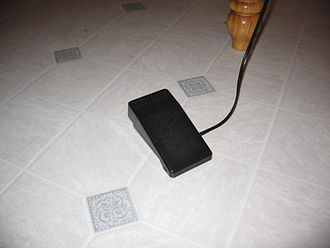
| − | The control is a foot pedal that is similar to the gas pedal in a car. | + | The control is a foot pedal that is similar to the gas pedal in a car. When it is fully depressed, the sewing machine operates at its maximum speed. When lightly depressed, the machine operates more slowly. When released, the sewing machine stops. Having a foot-operated control frees both hands for guiding the cloth through the machine. |
<br style="clear:both"/><br style="clear:both"/> | <br style="clear:both"/><br style="clear:both"/> | ||
| − | == | + | <!--T:62--> |
| − | The backspace lever (shown in the photo with the balance wheel) reverses the direction that the feed dogs move the cloth. | + | <noinclude></translate></noinclude> |
| + | {{CloseReq}} <!-- 2h --> | ||
| + | {{ansreq|page={{#titleparts:{{PAGENAME}}|2|1}}|num=2i}} <!--T:15--> | ||
| + | <noinclude><translate><!--T:63--> | ||
| + | </noinclude> | ||
| + | The backspace lever (shown in the photo with the balance wheel) reverses the direction that the feed dogs move the cloth. A stitch is often started an inch or so away from the back edge of the cloth with the backspace lever activated. When the stitch gets close to the back edge of the cloth, the lever is released and the cloth moves forward through the machine. Stitches are also ended this way. Doing this provides a stronger seam and locks the stitch in place. | ||
| + | |||
| + | <!--T:64--> | ||
| + | <noinclude></translate></noinclude> | ||
| + | {{CloseReq}} <!-- 2i --> | ||
| + | {{CloseReq}} <!-- 2 --> | ||
| + | {{ansreq|page={{#titleparts:{{PAGENAME}}|2|1}}|num=3}} | ||
| + | <noinclude><translate><!--T:65--> | ||
| + | </noinclude> | ||
| + | <!-- 3. Demonstrate how to properly thread and run the machine. --> | ||
| + | For the guys out there who think that sewing isn't a guy-thing, check out this video: | ||
| + | |||
| + | <!--T:66--> | ||
| + | {{#widget:YouTube|id=STIi6oInLjc}} | ||
| + | {{clear}} | ||
| + | |||
| + | ===Winding the Bobbin=== <!--T:67--> | ||
| + | First, check that the bobbin has enough thread of the right color for the work you wish to do. If it does not, you will need to wind a bobbin. First, pass a few inches of thread through a hole in the bobbin. Then place the bobbin on a spindle located on the top right of the sewing machine. You may need to move a lever into position. Loop the thread from the spool going to the left around a hook on the left of the machine, and then to the bobbin. Wind the thread back onto the spool until it is tight, but be careful not to pull it out of the hole in the bobbin! Then gently press the foot lever. The machine should wind thread onto the bobbin. When the bobbin is full (or when it has as much thread on it as you think you'll need), release the foot pedal, cut the thread, and place the bobbin back into its compartment. | ||
| + | |||
| + | ===Threading the machine=== <!--T:17--> | ||
| + | The spool mounts to a large spindle at the top center-right of the sewing machine. From there, the thread travels to the left to a button-like pulley and turns towards the operator. It travels across the top of the machine into a slot, and then turns downwards. Near the front, it should wrap around another "hitch" and go back up to the top of the machine, where it loops into a slot on the thread take-up. Again, the thread turns down until it gets to the needle, passing through the eye. (It helps if you trim the thread with sharp scissors before trying to thread a needle). | ||
| + | |||
| + | ===Run the machine=== <!--T:18--> | ||
| + | To run the machine, lift the presser foot and slide a piece of practice cloth beneath it. Then lower the presser foot. Gently press down on the foot pedal as you guide the cloth into the machine. Practice using the backspace lever and the foot pedal as you try to make a straight stitch. Once you get the hang of it, you'll find it's a lot of fun! | ||
| + | |||
| + | <!--T:68--> | ||
| + | <noinclude></translate></noinclude> | ||
| + | {{CloseReq}} <!-- 3 --> | ||
| + | {{ansreq|page={{#titleparts:{{PAGENAME}}|2|1}}|num=4}} | ||
| + | <noinclude><translate><!--T:69--> | ||
| + | </noinclude> | ||
| + | <!-- 4. Put a hem in one of the following items showing neat and even stitches: --> | ||
| − | + | <!--T:70--> | |
| − | == | + | <noinclude></translate></noinclude> |
| − | + | {{ansreq|page={{#titleparts:{{PAGENAME}}|2|1}}|num=4a}} | |
| + | <noinclude><translate><!--T:71--> | ||
| + | </noinclude> | ||
| − | == | + | <!--T:72--> |
| − | + | <noinclude></translate></noinclude> | |
| + | {{CloseReq}} <!-- 4a --> | ||
| + | {{ansreq|page={{#titleparts:{{PAGENAME}}|2|1}}|num=4b}} | ||
| + | <noinclude><translate><!--T:73--> | ||
| + | </noinclude> | ||
| − | == | + | <!--T:74--> |
| − | + | <noinclude></translate></noinclude> | |
| + | {{CloseReq}} <!-- 4b --> | ||
| + | {{ansreq|page={{#titleparts:{{PAGENAME}}|2|1}}|num=4c}} | ||
| + | <noinclude><translate><!--T:75--> | ||
| + | </noinclude> | ||
| − | == | + | <!--T:76--> |
| − | To make a hem, it is best to visit the ironing board before doing any stitching. | + | <noinclude></translate></noinclude> |
| + | {{CloseReq}} <!-- 4c --> | ||
| + | {{ansreq|page={{#titleparts:{{PAGENAME}}|2|1}}|num=4d}} <!--T:19--> | ||
| + | <noinclude><translate><!--T:77--> | ||
| + | </noinclude> | ||
| + | To make a hem, it is best to visit the ironing board before doing any stitching. Fold the cloth over and press a crease where the seam will be. Then fold it over again and press another crease. This will tuck the loose edge of the fabric into the seam so that it will not be exposed, and that will prevent it from unraveling. | ||
| − | Pressing the seam first helps tremendously when stitching the hem, because it prevents the hem from creeping. | + | <!--T:20--> |
| + | Pressing the seam first helps tremendously when stitching the hem, because it prevents the hem from creeping. Once the hem is creased, place the item on the sewing machine with the crease to the right. Lift the presser foot and slip the item beneath it. Line up the needle left-to-right so that it will place the stitch the desired distance from the edge of the hem. Line it up front-to-back so that the needle will pierce the cloth a half inch or so from the back edge of the hem. Then lower the presser foot. Hold down the backspace lever and gently press the foot pedal. As soon as the stitch reaches the back edge of the cloth, release the backspace lever, and the sewing machine will begin stitching in the forward direction. Going backwards first locks the stitch in place. | ||
| − | Gently guide the fabric into the sewing machine, paying careful attention to the edge. | + | <!--T:21--> |
| + | Gently guide the fabric into the sewing machine, paying careful attention to the edge. Sewing machines have lines etched into the surface beneath the needle for use as a guide. Try to guide the cloth using one of these guide lines to keep the stitch a constant distance from the edge of the hem. Don't try to go too fast. If you make a mistake, stop - you may need to remove the stitches and start over. It is far better to start over than to just keep sewing! | ||
| − | As the stitch nears the other end of the hem, slow down. | + | <!--T:22--> |
| + | As the stitch nears the other end of the hem, slow down. Stitch all the way to the edge of the hem, and press the backspace lever just as you reach it. Stitch backwards for about a half inch, again to lock down the stitch. Then stop. Use the balance wheel to raise the needle out of the cloth. You may need to raise the needle to its highest point so that the thread on the underside is released. After the needle has been raised, lift the presser foot and slide the fabric out from under the needle. Cut the thread (there will be two - a top thread and a bottom thread), but leave at least three inches of thread coming out of the eye of the needle. Otherwise, the next attempt at making a stitch could easily unthread the needle. | ||
| − | Remove the cloth from the machine and cut the loose threads from the hem. | + | <!--T:23--> |
| + | Remove the cloth from the machine and cut the loose threads from the hem. Ta da! You should now have a nice hem, and the machine should be ready to stitch another! | ||
| − | ==5. Demonstrate your ability to properly sew on buttons and snaps. | + | <!--T:78--> |
| − | The first step in sewing on a button or a snap is to properly locate it. | + | <noinclude></translate></noinclude> |
| + | {{CloseReq}} <!-- 4d --> | ||
| + | {{CloseReq}} <!-- 4 --> | ||
| + | {{ansreq|page={{#titleparts:{{PAGENAME}}|2|1}}|num=5}} | ||
| + | <noinclude><translate><!--T:79--> | ||
| + | </noinclude> | ||
| + | <!-- 5. Demonstrate your ability to properly sew on buttons and snaps. --> | ||
| + | The first step in sewing on a button or a snap is to properly locate it. If you are replacing a button, fasten the remaining buttons first - then see where the button hole for the missing button lines up. Thread a needle and tie it off, then mark the location of the button by passing the needle through the cloth from the underside. If desired, you can then unbutton the other buttons. | ||
| − | Pass the needle through one of the holes in the button from the back. | + | <!--T:25--> |
| + | Pass the needle through one of the holes in the button from the back. Then pass it through an adjacent hold from the front. Then insert the needle into the cloth near the point where the stitch was begun. Pull the thread tight, but not ''too'' tight. A little slack is desirable so that the button is not held too tightly to the cloth (that makes it hard to use the button). Ideally, the button should be able to pull away from the cloth by about an eighth of an inch. Loop through the cloth and the same two holes in the button half a dozen times or more. Then cross over and stitch through the other two holes (assuming a four-hole button), again making half a dozen or more loops. Finally, pass the needle through the cloth near the button, but do not go through the button hole. Snake the thread out from under the button, and wrap it around the thread several times. Then pass the needle back through the cloth, beneath the button and tie it off. | ||
| − | Be sure to use sturdy thread when attaching a button. | + | <!--T:26--> |
| + | Be sure to use sturdy thread when attaching a button. They take a lot of abuse. If attached well with strong thread though, the button should remain fastened for ''years'' of heavy use. | ||
| − | ==6. Tell what is meant by selvage, bias, and grain of fabric. | + | <!--T:80--> |
| + | <noinclude></translate></noinclude> | ||
| + | {{CloseReq}} <!-- 5 --> | ||
| + | {{ansreq|page={{#titleparts:{{PAGENAME}}|2|1}}|num=6}} | ||
| + | <noinclude><translate><!--T:81--> | ||
| + | </noinclude> | ||
| + | <!-- 6. Tell what is meant by selvage, bias, and grain of fabric. --> | ||
;Selvage: the edge of a piece of fabric, specially woven to resist unraveling. | ;Selvage: the edge of a piece of fabric, specially woven to resist unraveling. | ||
| − | ;Bias: is a line that would go from corner to corner on a square piece of fabric. | + | ;Bias: is a line that would go from corner to corner on a square piece of fabric. The bias of a fabric is very stretchy, crossing the fabric's threads at a 45° angle. |
| − | ;Grain of Fabric: is the internal lay of the fabric - that is how the threads from which the fabric is woven are arranged. | + | ;Grain of Fabric: is the internal lay of the fabric - that is how the threads from which the fabric is woven are arranged. The lengthwise grain is parallel to the selvage, and the crosswise grain is perpendicular to the selvage. |
| + | |||
| + | <!--T:82--> | ||
| + | <noinclude></translate></noinclude> | ||
| + | {{CloseReq}} <!-- 6 --> | ||
| + | {{ansreq|page={{#titleparts:{{PAGENAME}}|2|1}}|num=7}} | ||
| + | <noinclude><translate></noinclude> | ||
| + | <!-- 7. Make a laundry bag for camping, or a similar simple item. --> | ||
| + | ===Laundry Bag=== <!--T:83--> | ||
| + | A laundry bag is not difficult to make. It is usually made from two pieces of cloth: a circle and a rectangle. The circle should be about 1.25 inches larger in diameter than the desired laundry bag. The width of the rectangle should be the same as the circumference of the circle (diameter times 3.14) plus another 1.5 inches. The length of the rectangle should be the desired length of the laundry bag plus two inches. | ||
| + | |||
| + | <!--T:29--> | ||
| + | Once the circle and rectangle have been cut out, sew a wide hem along the width of the rectangle. Then thread a length of rope through the hem, leaving about six inches of rope coming out from both ends. | ||
| + | |||
| + | <!--T:30--> | ||
| + | The next stitch will form a tube from the rectangle. This stitch should be made while the tube is inside out, so make sure the roped hem is positioned as you want it before starting. Pin the two edges of the rectangle together and make a stitch along the entire length of the edges about 5/8" from the edge. This should complete the tube. Once the tube has been stitched, tie the two ends of the rope together (use a fisherman's knot as illustrated in the [[AY Honors/Knot Tying|Knot Tying]] honor). You should be able to cinch up the rope and cloth the opening of the laundry bag. This bag will also be carried by the rope. | ||
| + | |||
| + | <!--T:31--> | ||
| + | Next, with the tube still inside-out, pin the circle to the end of the tube opposite the roped hem. Once the circle is pinned into place, carefully sew it to the tube. When this stitch is complete, turn the bag inside out and admire your work. | ||
| + | |||
| + | ===Medical Mask=== <!--T:84--> | ||
| + | With the rise of COVID-19, several websites have provided instructions for making DIY a medical mask. Wearing a mask will reduce the chances of the wearer becoming infected, but more importantly, it can reduce the odds of the wearer infecting others. This is especially important because a person can be infected with he corona virus without showing any symptoms, and may spread the virus before becoming aware that they are infected. | ||
| + | |||
| + | <!--T:85--> | ||
| + | By using a homemade mask, you can reduce the demand for N95 masks which makes them more available to medical professionals who need them most. Wearing a mask in public sends the message that you care about others. | ||
| + | |||
| + | <!--T:86--> | ||
| + | Make sure to launder the mask after each use. You might need several so that you can always use a fresh one when you must leave your home. Remember that wearing a mask should not be a substitute for social distancing or frequent and thorough hand washing. Every action you take to reduce the chances of spreading COVID-19 or becoming infected yourself works together to greatly reduce those odds. | ||
| + | |||
| + | <!--T:87--> | ||
| + | *[https://www.hopkinsmedicine.org/coronavirus/_documents/INF2003076_VW_Hand-Sewn%20Mask%20instructions-1.pdf Johns Hopkins] | ||
| + | *[https://makermask.org/ Maker Mask] | ||
| − | + | <!--T:88--> | |
| − | + | To avoid potential confusion between a DIY mask and a medical grade mask, Johns Hopkins insists that you not make a mask from a solid color (especially not solid blue or solid white). If the only material you have on hand for making a mask is solid, consider [[AY Honors/Tie-Dye|tie-dying]] your material before using it to make a mask. Another alternative would be to label the mask as NOT MEDICAL GRADE with a Sharpie. You can do this on the inside if you like. | |
| − | + | <!--T:89--> | |
| + | Here is an easy mask pattern: | ||
| − | + | <!--T:90--> | |
| + | {{#widget:YouTube|id=uRfhuRNua_E}} | ||
| + | {{clear}} | ||
| − | + | <!--T:91--> | |
| + | <noinclude></translate></noinclude> | ||
| + | {{CloseReq}} <!-- 7 --> | ||
| + | <noinclude><translate></noinclude> | ||
| + | ==References== <!--T:32--> | ||
| + | <noinclude></translate></noinclude> | ||
| − | + | [[Category:Adventist Youth Honors Answer Book/Do at home{{GetLangSuffix}}]] | |
| − | [[Category:Adventist Youth Honors Answer Book/ | + | {{CloseHonorPage}} |
Latest revision as of 15:31, 3 January 2023
1
1a
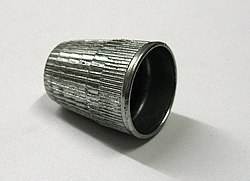
A thimble is a protective shield worn on the finger or thumb. It is used for pushing a needle through a piece of fabric in situations where the pressure applied to the needle would otherwise cause the needle to pierce the skin. A thimble is most usually made from metal, but can also be found made from leather, rubber, wood, glass or china.
1b
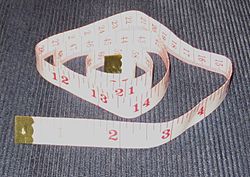
A cloth tape measure is used for measuring a person for the purpose of sizing a garment. It is also used to measure cloth.
1c
Scissors are generally multi-purpose and have similar small 'handles' with sharp blades that are riveted together. Scissors come in various sizes, quality and price ranges as well as with some design enhancements for specific tasks, such as for cutting hair, embroidery threads or crafts. You would use a pair of household scissors to cut parcel twine, paper, light card stock or food packages. Scissors are essential cutting tools and considered basic housewares.
Shears on the other hand have a noticeable design difference - one side (or both) has a larger handle to accommodate a couple of fingers (thumb in the top and fingers in the bottom). The handles are often attached with an adjustable screw for precision cutting (especially dressmaker's shears).
1d
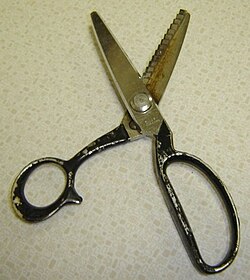
Pinking shears are scissors whose blades are sawtooth instead of straight. Pinking shears will leave a zigzag pattern instead of a straight edge.
Pinking shears are useful for cutting woven cloth. Cloth edges that are unfinished will easily fray, the weave becoming undone and threads pull out easily. The sawtooth pattern does not prevent the fraying but limits the length of the frayed thread and thus limits damage.
1e
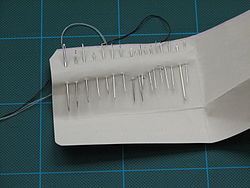
Needles are used for piercing a fabric and passing a thread through it for the purpose of making a stitch. This can be done by hand or by machine. A hand needle has a hole in it (called the eye) near its back. A machine needle has its eye near the point.
2
2a
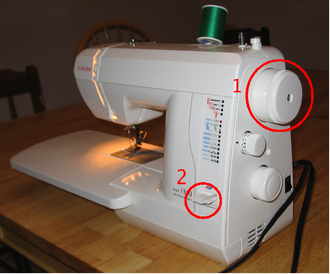
The balance wheel provides a method of manually moving the needle up or down. It is used to raise the needle out of the cloth when the stitch is finished, or to raise the thread take-up to make it accessible when threading the machine.
2b
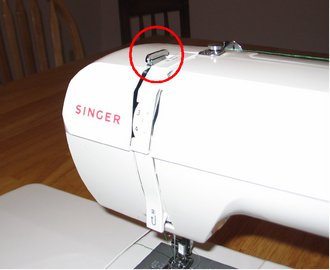
The thread take-up moves up and down with the needle, keeping the thread tight and drawing it from the spool as needed.
2c
The presser foot holds the cloth in place while the needle runs thread through it. See the photo below for its location.
2d
The presser foot lifter raises and lowers the presser foot. Raise it when you need to place a piece of cloth under the needle (and under the presser foot).
2e
The needle stitches the thread (green in the photo) through the cloth.
2f
The feed dogs are little tread-like pieces beneath the presser foot. As the sewing machine is operated, the feed dogs advance the cloth forward (or backwards if the backspace lever is activated). The presser foot holds the cloth against the feed dogs so that they can move the cloth along.
2g
The bobbin supplies a second spool of thread. Between the bobbin and the needle, two pieces of thread are tied into a knot forming the stitch. The bobbin can be filled with thread by removing it from the position shown and placing it in a mechanism on the top of the sewing machine. It is usually filled with the same color thread as is thread through the needle. The bobbin's thread comes up from the bottom of the machine through a plate between the feed dogs.
2h
The control is a foot pedal that is similar to the gas pedal in a car. When it is fully depressed, the sewing machine operates at its maximum speed. When lightly depressed, the machine operates more slowly. When released, the sewing machine stops. Having a foot-operated control frees both hands for guiding the cloth through the machine.
2i
The backspace lever (shown in the photo with the balance wheel) reverses the direction that the feed dogs move the cloth. A stitch is often started an inch or so away from the back edge of the cloth with the backspace lever activated. When the stitch gets close to the back edge of the cloth, the lever is released and the cloth moves forward through the machine. Stitches are also ended this way. Doing this provides a stronger seam and locks the stitch in place.
3
For the guys out there who think that sewing isn't a guy-thing, check out this video:
Winding the Bobbin
First, check that the bobbin has enough thread of the right color for the work you wish to do. If it does not, you will need to wind a bobbin. First, pass a few inches of thread through a hole in the bobbin. Then place the bobbin on a spindle located on the top right of the sewing machine. You may need to move a lever into position. Loop the thread from the spool going to the left around a hook on the left of the machine, and then to the bobbin. Wind the thread back onto the spool until it is tight, but be careful not to pull it out of the hole in the bobbin! Then gently press the foot lever. The machine should wind thread onto the bobbin. When the bobbin is full (or when it has as much thread on it as you think you'll need), release the foot pedal, cut the thread, and place the bobbin back into its compartment.
Threading the machine
The spool mounts to a large spindle at the top center-right of the sewing machine. From there, the thread travels to the left to a button-like pulley and turns towards the operator. It travels across the top of the machine into a slot, and then turns downwards. Near the front, it should wrap around another "hitch" and go back up to the top of the machine, where it loops into a slot on the thread take-up. Again, the thread turns down until it gets to the needle, passing through the eye. (It helps if you trim the thread with sharp scissors before trying to thread a needle).
Run the machine
To run the machine, lift the presser foot and slide a piece of practice cloth beneath it. Then lower the presser foot. Gently press down on the foot pedal as you guide the cloth into the machine. Practice using the backspace lever and the foot pedal as you try to make a straight stitch. Once you get the hang of it, you'll find it's a lot of fun!
4
4a
4b
4c
4d
To make a hem, it is best to visit the ironing board before doing any stitching. Fold the cloth over and press a crease where the seam will be. Then fold it over again and press another crease. This will tuck the loose edge of the fabric into the seam so that it will not be exposed, and that will prevent it from unraveling.
Pressing the seam first helps tremendously when stitching the hem, because it prevents the hem from creeping. Once the hem is creased, place the item on the sewing machine with the crease to the right. Lift the presser foot and slip the item beneath it. Line up the needle left-to-right so that it will place the stitch the desired distance from the edge of the hem. Line it up front-to-back so that the needle will pierce the cloth a half inch or so from the back edge of the hem. Then lower the presser foot. Hold down the backspace lever and gently press the foot pedal. As soon as the stitch reaches the back edge of the cloth, release the backspace lever, and the sewing machine will begin stitching in the forward direction. Going backwards first locks the stitch in place.
Gently guide the fabric into the sewing machine, paying careful attention to the edge. Sewing machines have lines etched into the surface beneath the needle for use as a guide. Try to guide the cloth using one of these guide lines to keep the stitch a constant distance from the edge of the hem. Don't try to go too fast. If you make a mistake, stop - you may need to remove the stitches and start over. It is far better to start over than to just keep sewing!
As the stitch nears the other end of the hem, slow down. Stitch all the way to the edge of the hem, and press the backspace lever just as you reach it. Stitch backwards for about a half inch, again to lock down the stitch. Then stop. Use the balance wheel to raise the needle out of the cloth. You may need to raise the needle to its highest point so that the thread on the underside is released. After the needle has been raised, lift the presser foot and slide the fabric out from under the needle. Cut the thread (there will be two - a top thread and a bottom thread), but leave at least three inches of thread coming out of the eye of the needle. Otherwise, the next attempt at making a stitch could easily unthread the needle.
Remove the cloth from the machine and cut the loose threads from the hem. Ta da! You should now have a nice hem, and the machine should be ready to stitch another!
5
The first step in sewing on a button or a snap is to properly locate it. If you are replacing a button, fasten the remaining buttons first - then see where the button hole for the missing button lines up. Thread a needle and tie it off, then mark the location of the button by passing the needle through the cloth from the underside. If desired, you can then unbutton the other buttons.
Pass the needle through one of the holes in the button from the back. Then pass it through an adjacent hold from the front. Then insert the needle into the cloth near the point where the stitch was begun. Pull the thread tight, but not too tight. A little slack is desirable so that the button is not held too tightly to the cloth (that makes it hard to use the button). Ideally, the button should be able to pull away from the cloth by about an eighth of an inch. Loop through the cloth and the same two holes in the button half a dozen times or more. Then cross over and stitch through the other two holes (assuming a four-hole button), again making half a dozen or more loops. Finally, pass the needle through the cloth near the button, but do not go through the button hole. Snake the thread out from under the button, and wrap it around the thread several times. Then pass the needle back through the cloth, beneath the button and tie it off.
Be sure to use sturdy thread when attaching a button. They take a lot of abuse. If attached well with strong thread though, the button should remain fastened for years of heavy use.
6
- Selvage
- the edge of a piece of fabric, specially woven to resist unraveling.
- Bias
- is a line that would go from corner to corner on a square piece of fabric. The bias of a fabric is very stretchy, crossing the fabric's threads at a 45° angle.
- Grain of Fabric
- is the internal lay of the fabric - that is how the threads from which the fabric is woven are arranged. The lengthwise grain is parallel to the selvage, and the crosswise grain is perpendicular to the selvage.
7
Laundry Bag
A laundry bag is not difficult to make. It is usually made from two pieces of cloth: a circle and a rectangle. The circle should be about 1.25 inches larger in diameter than the desired laundry bag. The width of the rectangle should be the same as the circumference of the circle (diameter times 3.14) plus another 1.5 inches. The length of the rectangle should be the desired length of the laundry bag plus two inches.
Once the circle and rectangle have been cut out, sew a wide hem along the width of the rectangle. Then thread a length of rope through the hem, leaving about six inches of rope coming out from both ends.
The next stitch will form a tube from the rectangle. This stitch should be made while the tube is inside out, so make sure the roped hem is positioned as you want it before starting. Pin the two edges of the rectangle together and make a stitch along the entire length of the edges about 5/8" from the edge. This should complete the tube. Once the tube has been stitched, tie the two ends of the rope together (use a fisherman's knot as illustrated in the Knot Tying honor). You should be able to cinch up the rope and cloth the opening of the laundry bag. This bag will also be carried by the rope.
Next, with the tube still inside-out, pin the circle to the end of the tube opposite the roped hem. Once the circle is pinned into place, carefully sew it to the tube. When this stitch is complete, turn the bag inside out and admire your work.
Medical Mask
With the rise of COVID-19, several websites have provided instructions for making DIY a medical mask. Wearing a mask will reduce the chances of the wearer becoming infected, but more importantly, it can reduce the odds of the wearer infecting others. This is especially important because a person can be infected with he corona virus without showing any symptoms, and may spread the virus before becoming aware that they are infected.
By using a homemade mask, you can reduce the demand for N95 masks which makes them more available to medical professionals who need them most. Wearing a mask in public sends the message that you care about others.
Make sure to launder the mask after each use. You might need several so that you can always use a fresh one when you must leave your home. Remember that wearing a mask should not be a substitute for social distancing or frequent and thorough hand washing. Every action you take to reduce the chances of spreading COVID-19 or becoming infected yourself works together to greatly reduce those odds.
To avoid potential confusion between a DIY mask and a medical grade mask, Johns Hopkins insists that you not make a mask from a solid color (especially not solid blue or solid white). If the only material you have on hand for making a mask is solid, consider tie-dying your material before using it to make a mask. Another alternative would be to label the mask as NOT MEDICAL GRADE with a Sharpie. You can do this on the inside if you like.
Here is an easy mask pattern:
