Difference between revisions of "AY Honors/Optics/Answer Key"
m (- Category of AYHAB) |
|||
| (18 intermediate revisions by 3 users not shown) | |||
| Line 1: | Line 1: | ||
| − | {{ | + | {{HonorSubpage}} |
| − | + | <section begin="Body" /> | |
| − | + | {{ansreq|page={{#titleparts:{{PAGENAME}}|2|1}}|num=1}} | |
| + | <noinclude><translate><!--T:85--> | ||
| + | </noinclude> | ||
| + | <!-- 1. Define and/or draw a diagram of the following: --> | ||
| + | <noinclude></translate></noinclude> | ||
| + | {{ansreq|page={{#titleparts:{{PAGENAME}}|2|1}}|num=1a}} | ||
| + | <noinclude><translate><!--T:86--> | ||
| + | </noinclude> | ||
| + | <!--T:2--> | ||
[[Image:Focal-length.png|frame|right|The focal point '''F''' and focal length ''f'' of a positive (convex) lens, a negative (concave) lens, a concave mirror, and a convex mirror.]] | [[Image:Focal-length.png|frame|right|The focal point '''F''' and focal length ''f'' of a positive (convex) lens, a negative (concave) lens, a concave mirror, and a convex mirror.]] | ||
| + | <!--T:3--> | ||
The distance from the lens (center of lens) or mirror to the focal point. | The distance from the lens (center of lens) or mirror to the focal point. | ||
| − | == | + | <!--T:123--> |
| + | {{clear}} | ||
| + | |||
| + | <!--T:87--> | ||
| + | <noinclude></translate></noinclude> | ||
| + | {{CloseReq}} <!-- 1a --> | ||
| + | {{ansreq|page={{#titleparts:{{PAGENAME}}|2|1}}|num=1b}} <!--T:4--> | ||
| + | <noinclude><translate><!--T:88--> | ||
| + | </noinclude> | ||
This type of lens creates a real image by converging the rays of light to a common focus. | This type of lens creates a real image by converging the rays of light to a common focus. | ||
| + | <!--T:5--> | ||
::[[Image:Lens1.png]] | ::[[Image:Lens1.png]] | ||
| − | == | + | <!--T:89--> |
| + | <noinclude></translate></noinclude> | ||
| + | {{CloseReq}} <!-- 1b --> | ||
| + | {{ansreq|page={{#titleparts:{{PAGENAME}}|2|1}}|num=1c}} <!--T:6--> | ||
| + | <noinclude><translate><!--T:90--> | ||
| + | </noinclude> | ||
| + | <!--T:7--> | ||
This type of lens diverges the light or causes it to spread. It creates a virtual focal point that appears to be the location where the light is coming from. | This type of lens diverges the light or causes it to spread. It creates a virtual focal point that appears to be the location where the light is coming from. | ||
| + | <!--T:8--> | ||
[[image:lens1b.png]] | [[image:lens1b.png]] | ||
| − | == | + | <!--T:91--> |
| + | <noinclude></translate></noinclude> | ||
| + | {{CloseReq}} <!-- 1c --> | ||
| + | {{ansreq|page={{#titleparts:{{PAGENAME}}|2|1}}|num=1d}} <!--T:9--> | ||
| + | <noinclude><translate><!--T:92--> | ||
| + | </noinclude> | ||
| + | <!--T:10--> | ||
;Barrel Distortion | ;Barrel Distortion | ||
| + | <!--T:11--> | ||
:The Magnification decreases as you get farther from the center of the lens. This is the type of distortion in fisheye lens. It appears like the image has been mapped around a sphere. | :The Magnification decreases as you get farther from the center of the lens. This is the type of distortion in fisheye lens. It appears like the image has been mapped around a sphere. | ||
| + | <!--T:12--> | ||
::[[Image:Barrel_distortion.svg|200px]] | ::[[Image:Barrel_distortion.svg|200px]] | ||
| + | <!--T:13--> | ||
;Pincushion Distortion | ;Pincushion Distortion | ||
| + | <!--T:14--> | ||
:The Magnification increases as you get farther from the center of the lens. This is the type of distortion is often seen in low quality telephoto lenses. It appears like the image has been pinched toward the middle. | :The Magnification increases as you get farther from the center of the lens. This is the type of distortion is often seen in low quality telephoto lenses. It appears like the image has been pinched toward the middle. | ||
| + | <!--T:15--> | ||
::[[Image:Pincushion_distortion.svg|200px]] | ::[[Image:Pincushion_distortion.svg|200px]] | ||
| − | == | + | <!--T:93--> |
| + | <noinclude></translate></noinclude> | ||
| + | {{CloseReq}} <!-- 1d --> | ||
| + | {{ansreq|page={{#titleparts:{{PAGENAME}}|2|1}}|num=1e}} <!--T:16--> | ||
| + | <noinclude><translate><!--T:94--> | ||
| + | </noinclude> | ||
| − | Different colors of light are bent to varying degrees as they go though a medium such as glass. This effect is called Chromatic Aberration. The affect is a longitudinal displacement | + | <!--T:17--> |
| + | Different colors of light are bent to varying degrees as they go though a medium such as glass. This effect is called Chromatic Aberration. The affect is a longitudinal displacement (along the axis of the lens) of the focus. | ||
| + | <!--T:18--> | ||
[[image:lens6a.png]] | [[image:lens6a.png]] | ||
| + | <!--T:19--> | ||
Chromatic aberration is caused by the fact that different colors of light travel at different speeds through a medium such as glass. The amount of bend in the light as it travels from one medium to another is given by Snell's law: | Chromatic aberration is caused by the fact that different colors of light travel at different speeds through a medium such as glass. The amount of bend in the light as it travels from one medium to another is given by Snell's law: | ||
| + | <!--T:20--> | ||
: <math>\frac{\sin\theta_1}{\sin\theta_2} = \frac{velocity\ 1}{velocity\ 2} = \frac{n_2}{n_1}</math> | : <math>\frac{\sin\theta_1}{\sin\theta_2} = \frac{velocity\ 1}{velocity\ 2} = \frac{n_2}{n_1}</math> | ||
| + | <!--T:21--> | ||
The bigger the difference in the velocities, the more bending takes place. | The bigger the difference in the velocities, the more bending takes place. | ||
| − | === | + | <!--T:95--> |
| − | + | <noinclude></translate></noinclude> | |
| + | {{CloseReq}} <!-- 1e --> | ||
| + | {{ansreq|page={{#titleparts:{{PAGENAME}}|2|1}}|num=1f}} <!--T:22--> | ||
| + | <noinclude><translate><!--T:96--> | ||
| + | </noinclude> | ||
| + | <noinclude></translate></noinclude> | ||
| + | {{CloseReq}} <!-- 1f --> | ||
| + | {{ansreq|page={{#titleparts:{{PAGENAME}}|2|1}}|num=1g}} | ||
| + | <noinclude><translate><!--T:97--> | ||
| + | </noinclude> | ||
[[Image:Spherical aberration 2.svg|thumb|300px|Spherical aberration. A perfect lens (top) focuses all incoming rays to a point on the optic axis. A real lens with spherical surfaces (bottom) suffers from spherical aberration: it focuses rays more tightly if they enter it far from the optic axis than if they enter closer to the axis. It therefore does not produce a perfect focal point. (Drawing is exaggerated.)]] | [[Image:Spherical aberration 2.svg|thumb|300px|Spherical aberration. A perfect lens (top) focuses all incoming rays to a point on the optic axis. A real lens with spherical surfaces (bottom) suffers from spherical aberration: it focuses rays more tightly if they enter it far from the optic axis than if they enter closer to the axis. It therefore does not produce a perfect focal point. (Drawing is exaggerated.)]] | ||
Lenses with surfaces that are spherically shaped are easier to manufacture, but they have a flaw that the light that travels through the lens near the center focuses at a different point than the light that travels through the lens near the edge. | Lenses with surfaces that are spherically shaped are easier to manufacture, but they have a flaw that the light that travels through the lens near the center focuses at a different point than the light that travels through the lens near the edge. | ||
| + | <!--T:23--> | ||
Spherical mirrors will show the same aberration as spherical lenses, but it is fairly easy to parabolize a mirror and cause the focus to be at a single point. Non spherical lenses are difficult to manufacture, but modern computer controlled polishing machines are improving lens quality. | Spherical mirrors will show the same aberration as spherical lenses, but it is fairly easy to parabolize a mirror and cause the focus to be at a single point. Non spherical lenses are difficult to manufacture, but modern computer controlled polishing machines are improving lens quality. | ||
{{clear}} | {{clear}} | ||
| − | == | + | <!--T:98--> |
| + | <noinclude></translate></noinclude> | ||
| + | {{CloseReq}} <!-- 1g --> | ||
| + | {{ansreq|page={{#titleparts:{{PAGENAME}}|2|1}}|num=1h}} <!--T:24--> | ||
| + | <noinclude><translate><!--T:99--> | ||
| + | </noinclude> | ||
| + | <!--T:25--> | ||
By using two lenses made of different materials we can minimize the amount of chromatic aberration that a lens creates. This principle is used in all high quality lenses to create a better image. | By using two lenses made of different materials we can minimize the amount of chromatic aberration that a lens creates. This principle is used in all high quality lenses to create a better image. | ||
| + | <!--T:26--> | ||
::[[image:lens6b.png]] | ::[[image:lens6b.png]] | ||
| − | == | + | <!--T:100--> |
| + | <noinclude></translate></noinclude> | ||
| + | {{CloseReq}} <!-- 1h --> | ||
| + | {{ansreq|page={{#titleparts:{{PAGENAME}}|2|1}}|num=1i}} <!--T:27--> | ||
| + | <noinclude><translate><!--T:101--> | ||
| + | </noinclude> | ||
Light is bent as it goes from one medium to another. The more difference there is in the two media, the greater the amount of refraction. | Light is bent as it goes from one medium to another. The more difference there is in the two media, the greater the amount of refraction. | ||
| − | ==2. Explain how light behaves when it strikes or traverses water, oil, feldspar, and a mirror. | + | <!--T:102--> |
| − | ===Water=== | + | <noinclude></translate></noinclude> |
| − | When light travels though air and strikes water it is bent or refracted. | + | {{CloseReq}} <!-- 1i --> |
| + | {{CloseReq}} <!-- 1 --> | ||
| + | {{ansreq|page={{#titleparts:{{PAGENAME}}|2|1}}|num=2}} | ||
| + | <noinclude><translate></noinclude> | ||
| + | <!-- 2. Explain how light behaves when it strikes or traverses water, oil, feldspar, and a mirror. --> | ||
| + | ===Water=== <!--T:103--> | ||
| + | When light travels though air and strikes water it is bent or refracted. This is caused by the difference between the speed of light through air and the speed of light through water. | ||
===Oil=== | ===Oil=== | ||
| − | When light strikes oil (or a soap bubble) it gets reflected ''twice''. | + | When light strikes oil (or a soap bubble) it gets reflected ''twice''. The first reflection occurs when light strikes the top surface of the oil, but not all of the light is reflected here. Some of the light penetrates the surface of the oil and is reflected from the bottom surface. This causes the light to undergo a ''phase shift''. When the light emerges from the oil and is recombined with light reflected from the surface, some of the light frequencies are canceled because of the phase shift, and others are reinforced. Which frequencies are canceled and which are reinforced depends on the angle at which they are viewed, and the viewing angle changes continuously over the surface of the oil. The effect is that one band of oil will appear yellow, another green, another yellow, etc. This is why you see a rainbow in a puddle of oil or on a soap bubble. |
| − | ===Feldspar=== | + | ===Feldspar=== <!--T:29--> |
| − | There are many varieties of feldspar, and therefore, many different ways in which it interacts with light. | + | There are many varieties of feldspar, and therefore, many different ways in which it interacts with light. Some feldspars (such as spectrolite) appear to have an iridescent sheen because the light is reflected from below the surface of the stone (this is the same effect discussed above under ''oil''. |
| − | Moonstone is a form of feldspar that is highly translucent to transparent. | + | <!--T:30--> |
| + | Moonstone is a form of feldspar that is highly translucent to transparent. | ||
| − | Orthoclase is a form of feldspar that is a transparent yellow (it reflects yellow light, but other colors go right through). | + | <!--T:31--> |
| + | Orthoclase is a form of feldspar that is a transparent yellow (it reflects yellow light, but other colors go right through). | ||
| + | <!--T:32--> | ||
Amazonite is an opaque green to blue-green form of feldspar. | Amazonite is an opaque green to blue-green form of feldspar. | ||
| − | ===Mirror=== | + | ===Mirror=== <!--T:33--> |
| − | Light striking a mirror is reflected. | + | Light striking a mirror is reflected. The angle at which the light strikes a mirror is equal to the angle of its reflection. |
| − | ==3. Name and draw diagrams of three kinds of positive lenses and three kinds of negative lenses. | + | <!--T:104--> |
| + | <noinclude></translate></noinclude> | ||
| + | {{CloseReq}} <!-- 2 --> | ||
| + | {{ansreq|page={{#titleparts:{{PAGENAME}}|2|1}}|num=3}} | ||
| + | <noinclude><translate><!--T:105--> | ||
| + | </noinclude> | ||
| + | <!-- 3. Name and draw diagrams of three kinds of positive lenses and three kinds of negative lenses. --> | ||
| − | [[image:Lens shapes.png|framed|center|<big>'''1''' - | + | <!--T:35--> |
| − | The four lenses at the top of this illustration are positive. | + | [[image:Lens shapes.png|framed|center|<big>'''1''' - Symmetrical double convex lens. '''2''' - Asymmetrical double-convex lens. '''3''' - Plano- convex lens. '''4''' - Positive meniscus lens.<br>'''5''' - Symmetrical biconcave lens. '''6''' - Asymmetrical biconcave lens. '''7''' - Plano-concave lens. '''8''' - Negative meniscus lens.</big>]] |
| + | The four lenses at the top of this illustration are positive. The four along the bottom are negative. | ||
| − | ==4. What should be the minimum distance of light source from the lens when testing for focal length? | + | <!--T:106--> |
| + | <noinclude></translate></noinclude> | ||
| + | {{CloseReq}} <!-- 3 --> | ||
| + | {{ansreq|page={{#titleparts:{{PAGENAME}}|2|1}}|num=4}} | ||
| + | <noinclude><translate><!--T:107--> | ||
| + | </noinclude> | ||
| + | <!-- 4. What should be the minimum distance of light source from the lens when testing for focal length? --> | ||
[[Image:Lens calc.png|thumb|450px|Measuring the focal point]] | [[Image:Lens calc.png|thumb|450px|Measuring the focal point]] | ||
| − | It depends on how accurately you want to measure the focal length. | + | It depends on how accurately you want to measure the focal length. The focal length can be determined by the equation: |
| − | :<math>\frac{1}{u} + \frac{1}{v} = \frac{1}{f} | + | <!--T:37--> |
| + | :<math>\frac{1}{u} + \frac{1}{v} = \frac{1}{f} </math> | ||
| − | Where <math>u</math> is the distance between the center of the lens and the light source, and <math>v</math> is the distance between the image the lens makes and the lens itself. | + | <!--T:38--> |
| + | Where <math>u</math> is the distance between the center of the lens and the light source, and <math>v</math> is the distance between the image the lens makes and the lens itself. If <math>u</math> is greater than 30 times the focal length, it can be disregarded because | ||
<math>\frac{1}{u}</math> is so small. | <math>\frac{1}{u}</math> is so small. | ||
| + | <!--T:39--> | ||
If you are using the sun for the light source, <math>u</math> is 93 million miles, meaning <math>\frac{1}{u}</math> is so tiny as to practically be zero. | If you are using the sun for the light source, <math>u</math> is 93 million miles, meaning <math>\frac{1}{u}</math> is so tiny as to practically be zero. | ||
| − | ==5. Find the focal length of at least four lenses, one being a negative lens. | + | <!--T:108--> |
| + | <noinclude></translate></noinclude> | ||
| + | {{CloseReq}} <!-- 4 --> | ||
| + | {{ansreq|page={{#titleparts:{{PAGENAME}}|2|1}}|num=5}} | ||
| + | <noinclude><translate></noinclude> | ||
| + | <!-- 5. Find the focal length of at least four lenses, one being a negative lens. --> | ||
[[Image:FocalLength.jpg|thumb|400px|Finding the focal length of a positive lens]] | [[Image:FocalLength.jpg|thumb|400px|Finding the focal length of a positive lens]] | ||
| − | ===Positive Lens=== | + | ===Positive Lens=== <!--T:109--> |
| − | Set a ruler on end on a work surface (a table, sidewalk, or a wood board). Using a bright light (such as the sun) as the light source, hold the lens against the ruler and slide it up and down the ruler until the light is focused on the work surface. | + | Set a ruler on end on a work surface (a table, sidewalk, or a wood board). Using a bright light (such as the sun) as the light source, hold the lens against the ruler and slide it up and down the ruler until the light is focused on the work surface. The point on the ruler that the focused lens touches is to be recorded as the Focal Length for that lens. |
{{clear}} | {{clear}} | ||
===Negative Lens=== | ===Negative Lens=== | ||
[[Image:Sistema afocale 2.png]] | [[Image:Sistema afocale 2.png]] | ||
{{clear}} | {{clear}} | ||
| − | Measuring the focal length of a negative lens is more difficult because light going through it does not converge to form an image. | + | Measuring the focal length of a negative lens is more difficult because light going through it does not converge to form an image. Instead, you will need to place a positive lens between the light source and the negative lens. Move the lenses and screen around until the light is focused. |
| − | Once focused, we can measure the distance between the negative lens and the image on the screen and call it <math>v_2</math>. | + | <!--T:41--> |
| + | Once focused, we can measure the distance between the negative lens and the image on the screen and call it <math>v_2</math>. The only other information we need for calculating the focal length of the negative lens is the distance between the negative lens and its object. But where is its object? It lies between the negative lens and the screen at the positive lens's focal point (which you have presumably already measured). | ||
| + | <!--T:42--> | ||
Therefore, the distance between the negative lens and its object <math>u_2</math> is the distance between the lenses <math>d</math> minus the positive lens's focal point <math>f_1</math> | Therefore, the distance between the negative lens and its object <math>u_2</math> is the distance between the lenses <math>d</math> minus the positive lens's focal point <math>f_1</math> | ||
| + | <!--T:43--> | ||
::<math>u_2 = d - f_1</math> | ::<math>u_2 = d - f_1</math> | ||
| + | <!--T:44--> | ||
Note that <math>d</math> should be smaller than <math>f_1</math> making <math>u_2</math> a negative number. | Note that <math>d</math> should be smaller than <math>f_1</math> making <math>u_2</math> a negative number. | ||
| + | <!--T:45--> | ||
Once we have <math>u_2</math>, we can get the focal length <math>f_2</math>: | Once we have <math>u_2</math>, we can get the focal length <math>f_2</math>: | ||
| + | <!--T:46--> | ||
::<math>\frac{1}{f_2} = \frac{1}{v_2} + \frac{1}{u_2}</math> | ::<math>\frac{1}{f_2} = \frac{1}{v_2} + \frac{1}{u_2}</math> | ||
| + | <!--T:47--> | ||
<math>f_2</math> should come out as a negative number. | <math>f_2</math> should come out as a negative number. | ||
{{clear}} | {{clear}} | ||
| Line 124: | Line 229: | ||
[[image:MeasuringNegativeLensFocalLenght.png|thumb|center|450px|Measuring the focal length of a negative lens using measuring microscope. Link->[http://commons.wikimedia.org/wiki/File:MeasuringMicroscope.jpg]]] | [[image:MeasuringNegativeLensFocalLenght.png|thumb|center|450px|Measuring the focal length of a negative lens using measuring microscope. Link->[http://commons.wikimedia.org/wiki/File:MeasuringMicroscope.jpg]]] | ||
| − | ==6. Explain by diagram why an image from a positive lens makes an image reversed and inverted. | + | <!--T:110--> |
| + | <noinclude></translate></noinclude> | ||
| + | {{CloseReq}} <!-- 5 --> | ||
| + | {{ansreq|page={{#titleparts:{{PAGENAME}}|2|1}}|num=6}} | ||
| + | <noinclude><translate><!--T:111--> | ||
| + | </noinclude> | ||
| + | <!-- 6. Explain by diagram why an image from a positive lens makes an image reversed and inverted. --> | ||
| + | <!--T:49--> | ||
By drawing lines representing the rays of light, we can show that the light creates an inverted image. | By drawing lines representing the rays of light, we can show that the light creates an inverted image. | ||
| + | <!--T:50--> | ||
[[image:lens3.png|550px]] | [[image:lens3.png|550px]] | ||
| − | ==7. Show with diagrams how a prism works. State the angles at which the colors appear and disappear. | + | <!--T:112--> |
| + | <noinclude></translate></noinclude> | ||
| + | {{CloseReq}} <!-- 6 --> | ||
| + | {{ansreq|page={{#titleparts:{{PAGENAME}}|2|1}}|num=7}} | ||
| + | <noinclude><translate><!--T:113--> | ||
| + | </noinclude> | ||
| + | <!-- 7. Show with diagrams how a prism works. State the angles at which the colors appear and disappear. --> | ||
[[Image:Dispersion_prism.jpg|thumb|200px]] | [[Image:Dispersion_prism.jpg|thumb|200px]] | ||
| + | <!--T:52--> | ||
A prism uses the fact that different colors of light are bent differently as they travel through a medium. This effect is also seen in chromatic aberration. | A prism uses the fact that different colors of light are bent differently as they travel through a medium. This effect is also seen in chromatic aberration. | ||
| + | <!--T:53--> | ||
The shape of a prism is an equilateral triangle. This causes the colors of light to disperse in a very predictable way. | The shape of a prism is an equilateral triangle. This causes the colors of light to disperse in a very predictable way. | ||
<br style="clear:both"> | <br style="clear:both"> | ||
| − | ==8. Show and demonstrate what happens when light strikes one-way glass. | + | <!--T:114--> |
| + | <noinclude></translate></noinclude> | ||
| + | {{CloseReq}} <!-- 7 --> | ||
| + | {{ansreq|page={{#titleparts:{{PAGENAME}}|2|1}}|num=8}} | ||
| + | <noinclude><translate><!--T:115--> | ||
| + | </noinclude> | ||
| + | <!-- 8. Show and demonstrate what happens when light strikes one-way glass. --> | ||
| + | <!--T:55--> | ||
One-way glass, also called a two-way mirror, or a one-way mirror, is a pane of glass with a partially reflective, partially transparent layer, used with a darkened room on one side and a well-lit room on the other, allowing those in the darkened room to see into the lighted room but not vice versa. | One-way glass, also called a two-way mirror, or a one-way mirror, is a pane of glass with a partially reflective, partially transparent layer, used with a darkened room on one side and a well-lit room on the other, allowing those in the darkened room to see into the lighted room but not vice versa. | ||
| + | <!--T:56--> | ||
The glass is coated with (or in some cases encases a layer of) a very thin almost transparent layer of metal (generally aluminum) to enhance its reflective nature. The result is what appears to be a mirror from one side, and tinted glass from the other. A viewer in the brightly lit area has difficulty seeing into the darkened room, through what appears to be a mirror. | The glass is coated with (or in some cases encases a layer of) a very thin almost transparent layer of metal (generally aluminum) to enhance its reflective nature. The result is what appears to be a mirror from one side, and tinted glass from the other. A viewer in the brightly lit area has difficulty seeing into the darkened room, through what appears to be a mirror. | ||
| + | <!--T:57--> | ||
To take full advantage of the partially mirrored surface, the target side should be brightly lit, to obscure any hint of light coming through the glass from the viewer's side. The darkened room is only completely obscured when it is in complete darkness. Sometimes a darkened curtain or a double door type vestibule is used to keep the viewers side darkened. | To take full advantage of the partially mirrored surface, the target side should be brightly lit, to obscure any hint of light coming through the glass from the viewer's side. The darkened room is only completely obscured when it is in complete darkness. Sometimes a darkened curtain or a double door type vestibule is used to keep the viewers side darkened. | ||
| − | ===Uses=== | + | ===Uses=== <!--T:58--> |
[[Image:Teleprompter schematic.svg|right|350px|thumb|One-Way Glass (4) used in a teleprompter to reflect a script.]] | [[Image:Teleprompter schematic.svg|right|350px|thumb|One-Way Glass (4) used in a teleprompter to reflect a script.]] | ||
One-way glass is used for: | One-way glass is used for: | ||
| Line 154: | Line 284: | ||
* The use of one-way glass is also apparent in the broadcast television where persons read from a script while seemingly looking directly at the camera. This effect is achieved where the camera is the viewer looking through the glass, upon which the prompt or script is also reflected for the subject to read. | * The use of one-way glass is also apparent in the broadcast television where persons read from a script while seemingly looking directly at the camera. This effect is achieved where the camera is the viewer looking through the glass, upon which the prompt or script is also reflected for the subject to read. | ||
| − | ==9. Construct one optical instrument using mirrors or lenses, such as a periscope, a slide or opaque projector, or a simple telescope. | + | <!--T:116--> |
| − | ===Periscope=== | + | <noinclude></translate></noinclude> |
| + | {{CloseReq}} <!-- 8 --> | ||
| + | {{ansreq|page={{#titleparts:{{PAGENAME}}|2|1}}|num=9}} | ||
| + | <noinclude><translate></noinclude> | ||
| + | <!-- 9. Construct one optical instrument using mirrors or lenses, such as a periscope, a slide or opaque projector, or a simple telescope. --> | ||
| + | ===Periscope=== <!--T:117--> | ||
[[Image:Simpleperiscopes.png|thumb|350px|right|'''Principle of the periscope.'''<br> | [[Image:Simpleperiscopes.png|thumb|350px|right|'''Principle of the periscope.'''<br> | ||
'''A''' - Periscope using two plane mirrors.<br> | '''A''' - Periscope using two plane mirrors.<br> | ||
| Line 161: | Line 296: | ||
'''1 - 2''' - Plane mirrors.<br> | '''1 - 2''' - Plane mirrors.<br> | ||
'''3 - 4''' - Right–angled prisms.<br> | '''3 - 4''' - Right–angled prisms.<br> | ||
| − | '''5 - 6''' | + | '''5 - 6''' - Observer eye.<br> |
'''7 - 8''' - Periscope tube.<br> | '''7 - 8''' - Periscope tube.<br> | ||
'''H''' - Periscope optical height.<br> | '''H''' - Periscope optical height.<br> | ||
| Line 168: | Line 303: | ||
A periscope is an instrument for observation from a concealed position. In its simplest form it is a tube in each end of which are mirrors set parallel to each other and at an angle of 45° with a line between them. | A periscope is an instrument for observation from a concealed position. In its simplest form it is a tube in each end of which are mirrors set parallel to each other and at an angle of 45° with a line between them. | ||
| + | <!--T:60--> | ||
A periscope may be used as a toy or for seeing over people's heads in a crowd. This form of periscope, with the addition of two simple lenses, was used for observation purposes in the trenches during World War I. | A periscope may be used as a toy or for seeing over people's heads in a crowd. This form of periscope, with the addition of two simple lenses, was used for observation purposes in the trenches during World War I. | ||
| − | A simple periscope can be made from two small, flat mirrors and a rectangular box (such as those in which aluminum foil or wax paper are packaged). | + | <!--T:61--> |
| + | A simple periscope can be made from two small, flat mirrors and a rectangular box (such as those in which aluminum foil or wax paper are packaged). Hot melt glue and strips of cardboard can be used to hold the mirrors in place. | ||
| + | <!--T:62--> | ||
{{clear}} | {{clear}} | ||
| − | ===Slide Projector=== | + | ===Slide Projector=== <!--T:63--> |
[[Image:Diaprojektor beleuchtungssystem IMGP1044.jpg|thumb|600px|Inside a slide projector]] | [[Image:Diaprojektor beleuchtungssystem IMGP1044.jpg|thumb|600px|Inside a slide projector]] | ||
{{clear}} | {{clear}} | ||
| Line 182: | Line 320: | ||
The '''opaque projector''', '''epidioscope''', '''epidiascope''' or '''episcope''' is a device which displays opaque materials by shining a bright lamp onto the object from above. A system of mirrors, prisms and/or imaging lenses is used to focus an image of the material onto a viewing screen. Because they must project the reflected light, opaque projectors require brighter bulbs and larger lenses than overhead projectors. Care must be taken that the materials are not damaged by the heat generated by the light source. Opaque projectors are not as common as the modern "overhead". | The '''opaque projector''', '''epidioscope''', '''epidiascope''' or '''episcope''' is a device which displays opaque materials by shining a bright lamp onto the object from above. A system of mirrors, prisms and/or imaging lenses is used to focus an image of the material onto a viewing screen. Because they must project the reflected light, opaque projectors require brighter bulbs and larger lenses than overhead projectors. Care must be taken that the materials are not damaged by the heat generated by the light source. Opaque projectors are not as common as the modern "overhead". | ||
| + | <!--T:64--> | ||
Opaque projectors are typically used to project images of book pages, drawings, mineral specimens, leaves, etc. They have been produced and marketed as artists’ enlargement tools to allow images to be transferred to surfaces such as prepared canvas, or for lectures and discourses. | Opaque projectors are typically used to project images of book pages, drawings, mineral specimens, leaves, etc. They have been produced and marketed as artists’ enlargement tools to allow images to be transferred to surfaces such as prepared canvas, or for lectures and discourses. | ||
{{clear}} | {{clear}} | ||
| − | ===Refracting Telescope=== | + | ===Refracting Telescope=== <!--T:65--> |
[[Image:Kepschem2.jpg|thumb|500px|Refracting telescope]] | [[Image:Kepschem2.jpg|thumb|500px|Refracting telescope]] | ||
All refracting telescopes use the same principles. The combination of an objective lenses (1) and some type of eyepiece (2) is used to gathered more light than the human eye could collect on its own, focused it (5), and present the viewer with a brighter, clearer, and magnified virtual image (6). The objective in a refracting telescope refracts or bends light. This refraction causes parallel light rays to converge at a focal point; while those which were not parallel converge upon a focal plane. Refracting telescopes can come in many different configurations to correct for image orientation and types of aberration. Because the image was formed by the bending of light, or refraction, these telescopes are called refracting telescopes or refractors. | All refracting telescopes use the same principles. The combination of an objective lenses (1) and some type of eyepiece (2) is used to gathered more light than the human eye could collect on its own, focused it (5), and present the viewer with a brighter, clearer, and magnified virtual image (6). The objective in a refracting telescope refracts or bends light. This refraction causes parallel light rays to converge at a focal point; while those which were not parallel converge upon a focal plane. Refracting telescopes can come in many different configurations to correct for image orientation and types of aberration. Because the image was formed by the bending of light, or refraction, these telescopes are called refracting telescopes or refractors. | ||
{{clear}} | {{clear}} | ||
| − | ===Reflecting Telescope=== | + | ===Reflecting Telescope=== <!--T:66--> |
| − | [[Image:Newtontelescope.png|thumb|right|300px|'''Diagram of | + | [[Image:Newtontelescope.png|thumb|right|300px|'''Diagram of Newtonian reflector''']] |
[[Image:Newtonian.PNG]] | [[Image:Newtonian.PNG]] | ||
{{clear}} | {{clear}} | ||
| − | In this diagram, light enters the telescope tube from the left and strikes the primary mirror (which is concave). | + | In this diagram, light enters the telescope tube from the left and strikes the primary mirror (which is concave). Light is then focused onto the secondary mirror mounted on a set of struts, and is then reflected out the side of the tube to the eyepiece. |
| − | ==10. Explain what is meant by the term 6x35 and 7x50 as applied to binoculars. | + | <!--T:118--> |
| + | <noinclude></translate></noinclude> | ||
| + | {{CloseReq}} <!-- 9 --> | ||
| + | {{ansreq|page={{#titleparts:{{PAGENAME}}|2|1}}|num=10}} | ||
| + | <noinclude><translate><!--T:119--> | ||
| + | </noinclude> | ||
| + | <!-- 10. Explain what is meant by the term 6x35 and 7x50 as applied to binoculars. --> | ||
[[Image:Porro binocular.jpg|thumb|right|300px|'''A typical Porro prism binoculars design''']] | [[Image:Porro binocular.jpg|thumb|right|300px|'''A typical Porro prism binoculars design''']] | ||
The numbers used for describing binoculars give the power followed by the diameter of the objective lens (The largest diameter lens) in millimeters. This means that 6x35 have a magnifying power of 6x and have a diameter of 35mm. | The numbers used for describing binoculars give the power followed by the diameter of the objective lens (The largest diameter lens) in millimeters. This means that 6x35 have a magnifying power of 6x and have a diameter of 35mm. | ||
| − | The power represents how much bigger an object appears than with the unaided eye. You can also think of how many times closer it appears to be. The diameter lets you know how much light is gathered by the lens. A 50mm objective lens gathers much more light than a 35mm objective lens. Because the amount of light that is gathered increases if we increase the area | + | <!--T:68--> |
| + | The power represents how much bigger an object appears than with the unaided eye. You can also think of how many times closer it appears to be. The diameter lets you know how much light is gathered by the lens. A 50mm objective lens gathers much more light than a 35mm objective lens. Because the amount of light that is gathered increases if we increase the area that the light hits, we can calculate the light gathering of a lens using the area of a circle: | ||
| − | Area of lens= π | + | <!--T:69--> |
| + | Area of lens= π (radius of lens)<math>^2</math> | ||
| + | <!--T:70--> | ||
{| border ="2" | {| border ="2" | ||
|+Numbers that Describe Binoculars | |+Numbers that Describe Binoculars | ||
| − | | Binocular Specification || Magnifying Power || Diameter of objective | + | | Binocular Specification || Magnifying Power || Diameter of objective (mm) || Area of objective <math>mm^2</math> || Light gathering power (compared to unaided eye) |
|- | |- | ||
|Unaided Eye || 1x || 8|| 50.265|| 1x | |Unaided Eye || 1x || 8|| 50.265|| 1x | ||
| Line 218: | Line 366: | ||
|} | |} | ||
| + | <!--T:71--> | ||
The 50mm objective lens collects 2.0408... times more light than a 35mm objective lens. If you are in a dark environment, you will get twice as much light with the 7x50 binoculars than with a 6x35. The 7x50 binoculars has more magnifying power (7/6 or 1.167 times) than the 6x35 binoculars. | The 50mm objective lens collects 2.0408... times more light than a 35mm objective lens. If you are in a dark environment, you will get twice as much light with the 7x50 binoculars than with a 6x35. The 7x50 binoculars has more magnifying power (7/6 or 1.167 times) than the 6x35 binoculars. | ||
| + | <!--T:72--> | ||
The higher the first number, the larger things appear, but the harder it is to hold the binoculars steady. Above 10x most people need a tripod to hold it steady enough to be useful. The higher the second number, the more light gathering power, which allows you to continue to see even in low light conditions, but the binoculars are much heavier as well. | The higher the first number, the larger things appear, but the harder it is to hold the binoculars steady. Above 10x most people need a tripod to hold it steady enough to be useful. The higher the second number, the more light gathering power, which allows you to continue to see even in low light conditions, but the binoculars are much heavier as well. | ||
| + | <!--T:73--> | ||
Knowing what the numbers on a pair of binoculars mean is important as you are choosing which ones are best for you, but binoculars are a very personal thing, so try them before you buy them. | Knowing what the numbers on a pair of binoculars mean is important as you are choosing which ones are best for you, but binoculars are a very personal thing, so try them before you buy them. | ||
| − | ==11. Define the term "f/stop" as used in connection with cameras. What does it mean when a lens is fast or slow? Is an f/8.5 lens faster or slower than an f/8 lens? | + | <!--T:120--> |
| + | <noinclude></translate></noinclude> | ||
| + | {{CloseReq}} <!-- 10 --> | ||
| + | {{ansreq|page={{#titleparts:{{PAGENAME}}|2|1}}|num=11}} | ||
| + | <noinclude><translate><!--T:121--> | ||
| + | </noinclude> | ||
| + | <!-- 11. Define the term "f/stop" as used in connection with cameras. What does it mean when a lens is fast or slow? Is an f/8.5 lens faster or slower than an f/8 lens? --> | ||
| + | <!--T:75--> | ||
A faster lens has a lower f-number, and lets in more light than a slower lens. The f-number is the ratio of the diameter of the entrance pupil to the focal length of the lens. | A faster lens has a lower f-number, and lets in more light than a slower lens. The f-number is the ratio of the diameter of the entrance pupil to the focal length of the lens. | ||
| + | <!--T:76--> | ||
<math>f\ number = \frac {Focal\ length} {Diameter\ of\ objective}</math> | <math>f\ number = \frac {Focal\ length} {Diameter\ of\ objective}</math> | ||
| + | <!--T:77--> | ||
The two parameters that define the f-number of an optical system are: | The two parameters that define the f-number of an optical system are: | ||
| + | <!--T:78--> | ||
;Focal Length | ;Focal Length | ||
:The longer the focal length, the more magnifying power the optical system has. You will choose a very long focal length lens if you wish to photograph birds, and a short focal length lens to photograph scenic shots such as a panarama. | :The longer the focal length, the more magnifying power the optical system has. You will choose a very long focal length lens if you wish to photograph birds, and a short focal length lens to photograph scenic shots such as a panarama. | ||
| + | <!--T:79--> | ||
;Diameter of the lens | ;Diameter of the lens | ||
:The larger the diameter the more light is let in. So to have a fast lens, you will need a large diameter lens, and the longer the focal length, the larger the diameter needs to be to have the same speed. A 50mm f/4 lens will have a diameter of 12.5 mm, but a 400mm f/4 lens will have a diameter of 100mm. | :The larger the diameter the more light is let in. So to have a fast lens, you will need a large diameter lens, and the longer the focal length, the larger the diameter needs to be to have the same speed. A 50mm f/4 lens will have a diameter of 12.5 mm, but a 400mm f/4 lens will have a diameter of 100mm. | ||
| + | <!--T:80--> | ||
The advantage of a faster lens is that there is more light, so it is easier to see, and for photography, you can keep the exposure time low. | The advantage of a faster lens is that there is more light, so it is easier to see, and for photography, you can keep the exposure time low. | ||
| + | <!--T:81--> | ||
The disadvantage of a fast lens is that it is heavier, and has less depth of field. | The disadvantage of a fast lens is that it is heavier, and has less depth of field. | ||
| − | ==References== | + | <!--T:122--> |
| + | <noinclude></translate></noinclude> | ||
| + | {{CloseReq}} <!-- 11 --> | ||
| + | <noinclude><translate></noinclude> | ||
| + | ==References== <!--T:82--> | ||
* http://www.tradeshop.com/gems/feldspar.html | * http://www.tradeshop.com/gems/feldspar.html | ||
| − | + | <noinclude></translate></noinclude> | |
| − | + | {{CloseHonorPage}} | |
| − | |||
| − | |||
| − | |||
| − | |||
| − | |||
Latest revision as of 18:10, 13 July 2022
1
1a
The distance from the lens (center of lens) or mirror to the focal point.
1b
1c
This type of lens diverges the light or causes it to spread. It creates a virtual focal point that appears to be the location where the light is coming from.
1d
- Barrel Distortion
- The Magnification decreases as you get farther from the center of the lens. This is the type of distortion in fisheye lens. It appears like the image has been mapped around a sphere.
- Pincushion Distortion
- The Magnification increases as you get farther from the center of the lens. This is the type of distortion is often seen in low quality telephoto lenses. It appears like the image has been pinched toward the middle.
1e
Different colors of light are bent to varying degrees as they go though a medium such as glass. This effect is called Chromatic Aberration. The affect is a longitudinal displacement (along the axis of the lens) of the focus.
Chromatic aberration is caused by the fact that different colors of light travel at different speeds through a medium such as glass. The amount of bend in the light as it travels from one medium to another is given by Snell's law:
- [math]\displaystyle{ \frac{\sin\theta_1}{\sin\theta_2} = \frac{velocity\ 1}{velocity\ 2} = \frac{n_2}{n_1} }[/math]
The bigger the difference in the velocities, the more bending takes place.
1f
1g
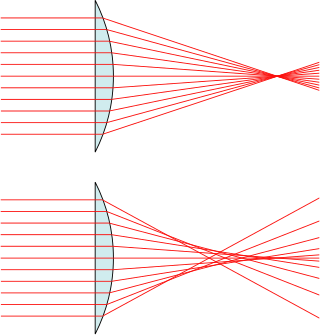
Lenses with surfaces that are spherically shaped are easier to manufacture, but they have a flaw that the light that travels through the lens near the center focuses at a different point than the light that travels through the lens near the edge.
Spherical mirrors will show the same aberration as spherical lenses, but it is fairly easy to parabolize a mirror and cause the focus to be at a single point. Non spherical lenses are difficult to manufacture, but modern computer controlled polishing machines are improving lens quality.
1h
By using two lenses made of different materials we can minimize the amount of chromatic aberration that a lens creates. This principle is used in all high quality lenses to create a better image.
1i
Light is bent as it goes from one medium to another. The more difference there is in the two media, the greater the amount of refraction.
2
Water
When light travels though air and strikes water it is bent or refracted. This is caused by the difference between the speed of light through air and the speed of light through water.
Oil
When light strikes oil (or a soap bubble) it gets reflected twice. The first reflection occurs when light strikes the top surface of the oil, but not all of the light is reflected here. Some of the light penetrates the surface of the oil and is reflected from the bottom surface. This causes the light to undergo a phase shift. When the light emerges from the oil and is recombined with light reflected from the surface, some of the light frequencies are canceled because of the phase shift, and others are reinforced. Which frequencies are canceled and which are reinforced depends on the angle at which they are viewed, and the viewing angle changes continuously over the surface of the oil. The effect is that one band of oil will appear yellow, another green, another yellow, etc. This is why you see a rainbow in a puddle of oil or on a soap bubble.
Feldspar
There are many varieties of feldspar, and therefore, many different ways in which it interacts with light. Some feldspars (such as spectrolite) appear to have an iridescent sheen because the light is reflected from below the surface of the stone (this is the same effect discussed above under oil.
Moonstone is a form of feldspar that is highly translucent to transparent.
Orthoclase is a form of feldspar that is a transparent yellow (it reflects yellow light, but other colors go right through).
Amazonite is an opaque green to blue-green form of feldspar.
Mirror
Light striking a mirror is reflected. The angle at which the light strikes a mirror is equal to the angle of its reflection.
3
The four lenses at the top of this illustration are positive. The four along the bottom are negative.
4
It depends on how accurately you want to measure the focal length. The focal length can be determined by the equation:
- [math]\displaystyle{ \frac{1}{u} + \frac{1}{v} = \frac{1}{f} }[/math]
Where [math]\displaystyle{ u }[/math] is the distance between the center of the lens and the light source, and [math]\displaystyle{ v }[/math] is the distance between the image the lens makes and the lens itself. If [math]\displaystyle{ u }[/math] is greater than 30 times the focal length, it can be disregarded because [math]\displaystyle{ \frac{1}{u} }[/math] is so small.
If you are using the sun for the light source, [math]\displaystyle{ u }[/math] is 93 million miles, meaning [math]\displaystyle{ \frac{1}{u} }[/math] is so tiny as to practically be zero.
5
Positive Lens
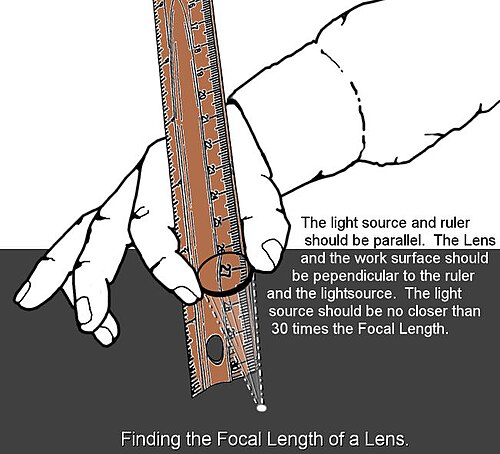
Set a ruler on end on a work surface (a table, sidewalk, or a wood board). Using a bright light (such as the sun) as the light source, hold the lens against the ruler and slide it up and down the ruler until the light is focused on the work surface. The point on the ruler that the focused lens touches is to be recorded as the Focal Length for that lens.
Negative Lens
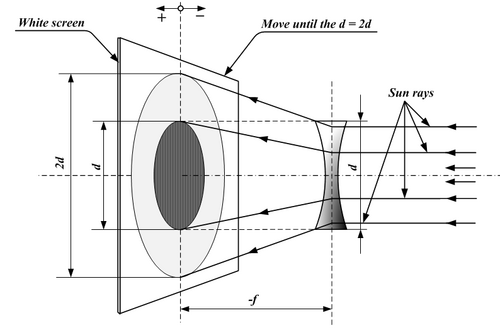
Measuring the focal length of a negative lens is more difficult because light going through it does not converge to form an image. Instead, you will need to place a positive lens between the light source and the negative lens. Move the lenses and screen around until the light is focused.
Once focused, we can measure the distance between the negative lens and the image on the screen and call it [math]\displaystyle{ v_2 }[/math]. The only other information we need for calculating the focal length of the negative lens is the distance between the negative lens and its object. But where is its object? It lies between the negative lens and the screen at the positive lens's focal point (which you have presumably already measured).
Therefore, the distance between the negative lens and its object [math]\displaystyle{ u_2 }[/math] is the distance between the lenses [math]\displaystyle{ d }[/math] minus the positive lens's focal point [math]\displaystyle{ f_1 }[/math]
- [math]\displaystyle{ u_2 = d - f_1 }[/math]
Note that [math]\displaystyle{ d }[/math] should be smaller than [math]\displaystyle{ f_1 }[/math] making [math]\displaystyle{ u_2 }[/math] a negative number.
Once we have [math]\displaystyle{ u_2 }[/math], we can get the focal length [math]\displaystyle{ f_2 }[/math]:
- [math]\displaystyle{ \frac{1}{f_2} = \frac{1}{v_2} + \frac{1}{u_2} }[/math]
[math]\displaystyle{ f_2 }[/math] should come out as a negative number.
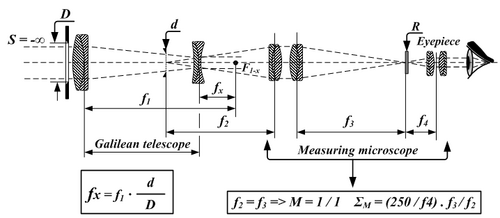
Another method for measuring focal length of a negative lens:
6
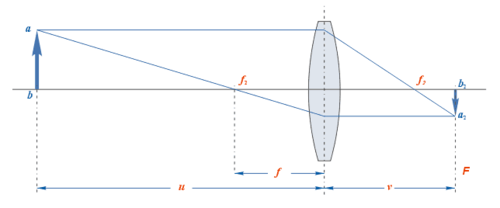
By drawing lines representing the rays of light, we can show that the light creates an inverted image.
7
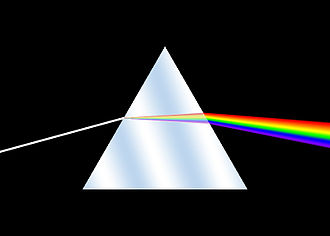
A prism uses the fact that different colors of light are bent differently as they travel through a medium. This effect is also seen in chromatic aberration.
The shape of a prism is an equilateral triangle. This causes the colors of light to disperse in a very predictable way.
8
One-way glass, also called a two-way mirror, or a one-way mirror, is a pane of glass with a partially reflective, partially transparent layer, used with a darkened room on one side and a well-lit room on the other, allowing those in the darkened room to see into the lighted room but not vice versa.
The glass is coated with (or in some cases encases a layer of) a very thin almost transparent layer of metal (generally aluminum) to enhance its reflective nature. The result is what appears to be a mirror from one side, and tinted glass from the other. A viewer in the brightly lit area has difficulty seeing into the darkened room, through what appears to be a mirror.
To take full advantage of the partially mirrored surface, the target side should be brightly lit, to obscure any hint of light coming through the glass from the viewer's side. The darkened room is only completely obscured when it is in complete darkness. Sometimes a darkened curtain or a double door type vestibule is used to keep the viewers side darkened.
Uses
One-way glass is used for:
- providing security, through covert viewing, of public spaces.
- for the protection of covert camera
- for some police interrogation rooms.
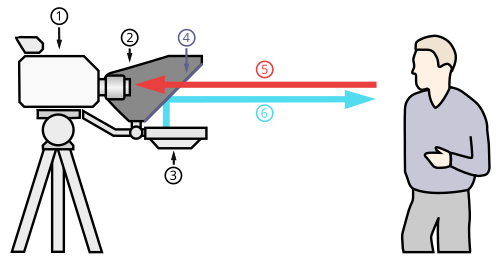
- The use of one-way glass is also apparent in the broadcast television where persons read from a script while seemingly looking directly at the camera. This effect is achieved where the camera is the viewer looking through the glass, upon which the prompt or script is also reflected for the subject to read.
9
Periscope
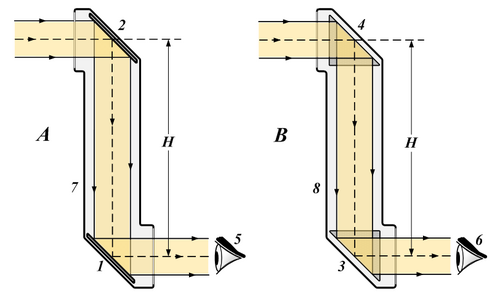
A - Periscope using two plane mirrors.
B - Periscope using two right–angled prisms.
1 - 2 - Plane mirrors.
3 - 4 - Right–angled prisms.
5 - 6 - Observer eye.
7 - 8 - Periscope tube.
H - Periscope optical height.
Different types of periscopes:
Lens periscopes. [2]
Handheld periscope. [3]
Submarine periscope.[4]
A periscope is an instrument for observation from a concealed position. In its simplest form it is a tube in each end of which are mirrors set parallel to each other and at an angle of 45° with a line between them.
A periscope may be used as a toy or for seeing over people's heads in a crowd. This form of periscope, with the addition of two simple lenses, was used for observation purposes in the trenches during World War I.
A simple periscope can be made from two small, flat mirrors and a rectangular box (such as those in which aluminum foil or wax paper are packaged). Hot melt glue and strips of cardboard can be used to hold the mirrors in place.
Slide Projector
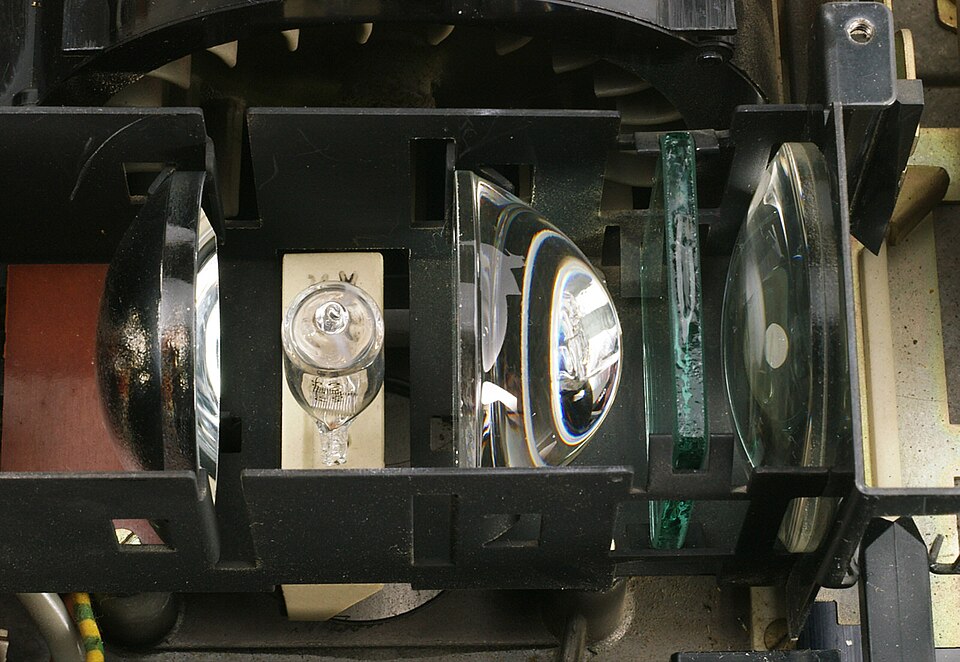
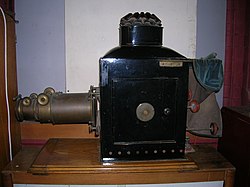
A slide projector is an opto-mechanical device to view photographic slides. It has four main elements: a fan-cooled electric light bulb or other light source, a reflector and "condensing" lens to direct the light to the slide, a holder for the slide and a focusing lens. A flat piece of heat absorbing glass is often placed in the light path between the condensing lens and the slide, to avoid damaging the latter. This glass transmits visible wavelengths but absorbs infrared. Light passes through the transparent slide and lens, and the resulting image is enlarged and projected onto a perpendicular flat screen so the audience can view its reflection.
Opaque Projector
The opaque projector, epidioscope, epidiascope or episcope is a device which displays opaque materials by shining a bright lamp onto the object from above. A system of mirrors, prisms and/or imaging lenses is used to focus an image of the material onto a viewing screen. Because they must project the reflected light, opaque projectors require brighter bulbs and larger lenses than overhead projectors. Care must be taken that the materials are not damaged by the heat generated by the light source. Opaque projectors are not as common as the modern "overhead".
Opaque projectors are typically used to project images of book pages, drawings, mineral specimens, leaves, etc. They have been produced and marketed as artists’ enlargement tools to allow images to be transferred to surfaces such as prepared canvas, or for lectures and discourses.
Refracting Telescope
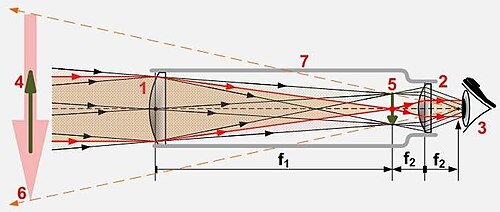
All refracting telescopes use the same principles. The combination of an objective lenses (1) and some type of eyepiece (2) is used to gathered more light than the human eye could collect on its own, focused it (5), and present the viewer with a brighter, clearer, and magnified virtual image (6). The objective in a refracting telescope refracts or bends light. This refraction causes parallel light rays to converge at a focal point; while those which were not parallel converge upon a focal plane. Refracting telescopes can come in many different configurations to correct for image orientation and types of aberration. Because the image was formed by the bending of light, or refraction, these telescopes are called refracting telescopes or refractors.
Reflecting Telescope
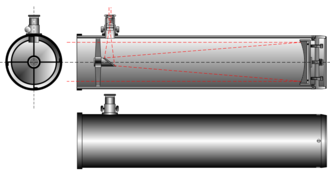
In this diagram, light enters the telescope tube from the left and strikes the primary mirror (which is concave). Light is then focused onto the secondary mirror mounted on a set of struts, and is then reflected out the side of the tube to the eyepiece.
10
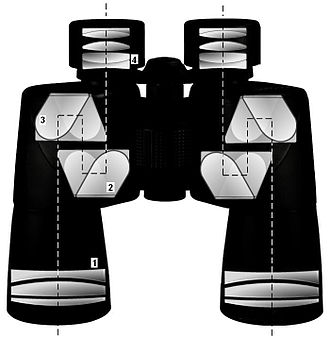
The numbers used for describing binoculars give the power followed by the diameter of the objective lens (The largest diameter lens) in millimeters. This means that 6x35 have a magnifying power of 6x and have a diameter of 35mm.
The power represents how much bigger an object appears than with the unaided eye. You can also think of how many times closer it appears to be. The diameter lets you know how much light is gathered by the lens. A 50mm objective lens gathers much more light than a 35mm objective lens. Because the amount of light that is gathered increases if we increase the area that the light hits, we can calculate the light gathering of a lens using the area of a circle:
Area of lens= π (radius of lens)[math]\displaystyle{ ^2 }[/math]
| Binocular Specification | Magnifying Power | Diameter of objective (mm) | Area of objective [math]\displaystyle{ mm^2 }[/math] | Light gathering power (compared to unaided eye) |
| Unaided Eye | 1x | 8 | 50.265 | 1x |
| 10x25 | 10x | 25 | 490.8738 | 9.7x |
| 6x35 | 6x | 35 | 962.11275 | 19.14x |
| 7x50 | 7x | 50 | 1,963.495 | 39.06x |
The 50mm objective lens collects 2.0408... times more light than a 35mm objective lens. If you are in a dark environment, you will get twice as much light with the 7x50 binoculars than with a 6x35. The 7x50 binoculars has more magnifying power (7/6 or 1.167 times) than the 6x35 binoculars.
The higher the first number, the larger things appear, but the harder it is to hold the binoculars steady. Above 10x most people need a tripod to hold it steady enough to be useful. The higher the second number, the more light gathering power, which allows you to continue to see even in low light conditions, but the binoculars are much heavier as well.
Knowing what the numbers on a pair of binoculars mean is important as you are choosing which ones are best for you, but binoculars are a very personal thing, so try them before you buy them.
11
A faster lens has a lower f-number, and lets in more light than a slower lens. The f-number is the ratio of the diameter of the entrance pupil to the focal length of the lens.
[math]\displaystyle{ f\ number = \frac {Focal\ length} {Diameter\ of\ objective} }[/math]
The two parameters that define the f-number of an optical system are:
- Focal Length
- The longer the focal length, the more magnifying power the optical system has. You will choose a very long focal length lens if you wish to photograph birds, and a short focal length lens to photograph scenic shots such as a panarama.
- Diameter of the lens
- The larger the diameter the more light is let in. So to have a fast lens, you will need a large diameter lens, and the longer the focal length, the larger the diameter needs to be to have the same speed. A 50mm f/4 lens will have a diameter of 12.5 mm, but a 400mm f/4 lens will have a diameter of 100mm.
The advantage of a faster lens is that there is more light, so it is easier to see, and for photography, you can keep the exposure time low.
The disadvantage of a fast lens is that it is heavier, and has less depth of field.
