Difference between revisions of "AY Honors/Rock Climbing/Answer Key"
| (35 intermediate revisions by 6 users not shown) | |||
| Line 1: | Line 1: | ||
| − | {{ | + | {{HonorSubpage}} |
| − | {{ | + | <!--{{Honor_Master|honor=Rock Climbing|master=Recreation}}--> |
| + | <section begin="Body" /> | ||
| + | {{ansreq|page={{#titleparts:{{PAGENAME}}|2|1}}|num=1}} | ||
| + | <noinclude><translate><!--T:120--> | ||
| + | </noinclude> | ||
| + | <!-- 1. Know and practice the safety precautions that should be followed while rock climbing. --> | ||
| + | <noinclude></translate></noinclude> | ||
| + | {{CloseReq}} <!-- 1 --> | ||
| + | {{ansreq|page={{#titleparts:{{PAGENAME}}|2|1}}|num=2}} | ||
| + | <noinclude><translate><!--T:121--> | ||
| + | </noinclude> | ||
| + | <!-- 2. Be familiar with and demonstrate the use of the following equipment: carabiners, pitons (various types), jam nuts (various types), runners, and nylon climbing rope. --> | ||
| + | <noinclude></translate></noinclude> | ||
| + | {{CloseReq}} <!-- 2 --> | ||
| + | {{ansreq|page={{#titleparts:{{PAGENAME}}|2|1}}|num=3}} | ||
| + | <noinclude><translate><!--T:122--> | ||
| + | </noinclude> | ||
| + | <!-- 3. Show how to care for and coil the climbing rope. Know how to tie and use the following knots: bowline on a coil, bowline on a bight, figure eight, ring bend, double fisherman's, and Prusik. --> | ||
| − | + | ===Caring for and Coiling the Climbing Rope=== <!--T:3--> | |
| − | == | + | {{:AY Honors/Knot/Care_Of_Rope}} |
| − | == | ||
| − | |||
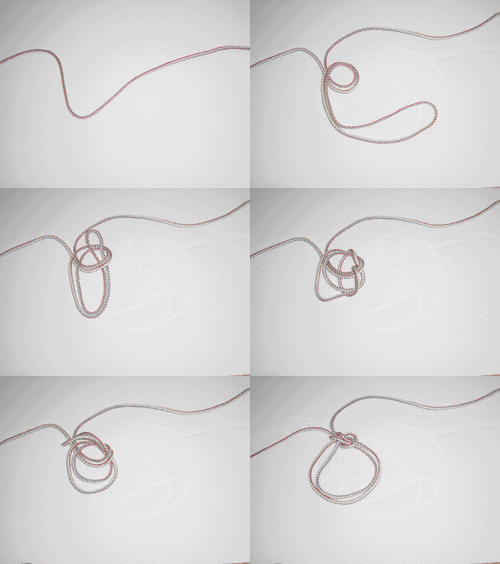
| − | === | + | ===Bowline on a coil=== <!--T:4--> |
| − | {{: | + | {{:AY Honors/Knot/Bowline_on_a_coil}} |
| − | ===Bowline on a | + | ===Bowline on a bight=== <!--T:5--> |
| − | {{: | + | {{:AY Honors/Knot/Bowline on a bight}} |
| − | === | + | ===Figure Eight=== <!--T:6--> |
| − | {{: | + | {{:AY Honors/Knot/Figure_8}} |
| − | === | + | ===Ring Bend=== <!--T:7--> |
| − | {{: | + | {{:AY Honors/Knot/Ring_Bend_Knot}} |
| − | === | + | ===Double Fisherman's=== <!--T:8--> |
| − | {{: | + | {{:AY Honors/Knot/Double_Fishermans_Knot}} |
| − | === | + | ===Prusik=== <!--T:9--> |
| − | {{: | + | {{:AY Honors/Knot/Prusik}} |
| − | === | + | <!--T:123--> |
| − | {{: | + | <noinclude></translate></noinclude> |
| + | {{CloseReq}} <!-- 3 --> | ||
| + | {{ansreq|page={{#titleparts:{{PAGENAME}}|2|1}}|num=4}} | ||
| + | <noinclude><translate><!--T:124--> | ||
| + | </noinclude> | ||
| + | <!-- 4. Know when to rope up into a rope team and type of rope team movement for class three, four, and five climbing. --> | ||
| + | <noinclude></translate></noinclude> | ||
| + | {{CloseReq}} <!-- 4 --> | ||
| + | {{ansreq|page={{#titleparts:{{PAGENAME}}|2|1}}|num=5}} | ||
| + | <noinclude><translate><!--T:125--> | ||
| + | </noinclude> | ||
| + | <!-- 5. Describe the six different classes of climbing and methods of rating climbs. --> | ||
| + | The adjectival grades are as follows: | ||
| + | Easy (rarely used) | ||
| + | Moderate (M, or "Mod") | ||
| + | Difficult (D, or "Diff") | ||
| + | Hard Difficult (HD, or "Hard Diff" - often omitted) | ||
| + | Very Difficult (VD, or "V Diff") | ||
| + | Hard Very Difficult (HVD, or "Hard V Diff" - sometimes omitted) | ||
| + | Mild Severe (MS - often omitted) | ||
| + | Severe (S) | ||
| + | Hard Severe (HS) | ||
| + | Mild Very Severe (MVS - often omitted) | ||
| + | Very Severe (VS) | ||
| + | Hard Very Severe (HVS) | ||
| + | Extremely Severe (E1, E2, E3, ...) | ||
| − | + | <!--T:126--> | |
| − | + | <noinclude></translate></noinclude> | |
| − | + | {{CloseReq}} <!-- 5 --> | |
| − | + | {{ansreq|page={{#titleparts:{{PAGENAME}}|2|1}}|num=6}} | |
| − | + | <noinclude><translate><!--T:127--> | |
| − | + | </noinclude> | |
| − | + | <!-- 6. Show how to static belay by belaying two climbers up in actual climbing. Show knowledge of proper body positions, braking surfaces, bracing and anchoring, and taking in the rope during the use of static belaying. --> | |
| + | <noinclude></translate></noinclude> | ||
| + | {{CloseReq}} <!-- 6 --> | ||
| + | {{ansreq|page={{#titleparts:{{PAGENAME}}|2|1}}|num=7}} | ||
| + | <noinclude><translate><!--T:128--> | ||
| + | </noinclude> | ||
| + | <!-- 7. Know and use the following climbing signals: belay on, climbing, climb, up rope, slack, tension, falling, rock, off belay, belay off, belay to point. --> | ||
| + | <noinclude></translate></noinclude> | ||
| + | {{CloseReq}} <!-- 7 --> | ||
| + | {{ansreq|page={{#titleparts:{{PAGENAME}}|2|1}}|num=8}} | ||
| + | <noinclude><translate><!--T:129--> | ||
| + | </noinclude> | ||
| + | <!-- 8. Using Prusik knots and slings, ascend 25 feet (7.62 meters) of vertical rope. Show how to use mechanical ascending devices such as jumars, Gibbs ascenders, etc. --> | ||
| − | {{: | + | <!--T:130--> |
| + | <noinclude></translate></noinclude> | ||
| + | {{CloseReq}} <!-- 8 --> | ||
| + | {{ansreq|page={{#titleparts:{{PAGENAME}}|2|1}}|num=9}} | ||
| + | <noinclude><translate><!--T:131--> | ||
| + | </noinclude> | ||
| + | <!-- 9. Properly free climb up to 5.3 (F3) difficulty on two different pitches a distance of at least 50 feet (15.24 meters) with an upper belay. Understand and practice the following free climbing concepts: rhythm, looking ahead, weight over the feet, balance climbing, counterforce climbing, and jamming. --> | ||
| + | <noinclude></translate></noinclude> | ||
| + | {{CloseReq}} <!-- 9 --> | ||
| + | {{ansreq|page={{#titleparts:{{PAGENAME}}|2|1}}|num=10}} | ||
| + | <noinclude><translate><!--T:132--> | ||
| + | </noinclude> | ||
| + | <!-- 10. Show how to set up a rappel. Rappel using figure eights or other mechanical brake methods. Do at least two 50-foot (15.24 meters) rappels. --> | ||
| − | + | <!--T:11--> | |
| + | {{:AY Honors/Rock_Climbing/Figure_Eights}} | ||
| − | [[Category: | + | <!--T:133--> |
| + | <noinclude></translate></noinclude> | ||
| + | {{CloseReq}} <!-- 10 --> | ||
| + | <noinclude><translate></noinclude> | ||
| + | ==References== <!--T:12--> | ||
| + | <noinclude></translate></noinclude> | ||
| + | |||
| + | [[Category:AY Honors/noindex{{GetLangSuffix}}|{{SUBPAGENAME}}]] | ||
| + | [[Category:Instructor Required{{GetLangSuffix}}|{{SUBPAGENAME}}]] | ||
| + | |||
| + | {{CloseHonorPage}} | ||
Latest revision as of 20:59, 5 October 2021
1
2
3
Caring for and Coiling the Climbing Rope
- a. Keep the rope clean.
- b. Always coil a rope before storing it.
- c. Make sure wet rope is dry before coiling it.
- d. Return rope to its proper place after using it.
Bowline on a coil
| Bowline on a coil |
|---|
|
Use: This is used as an impromptu harness, however is not recommended today since there are commercially available pre-fabricated harnesses. This method is preferable to a single loop because it distributes weight across all the loops/wraps.
How to tie:
|
Bowline on a bight
| Bowline on a bight |
|---|
|
Use: This makes a secure loop in the middle of a rope which does not slip.
How to tie:
|
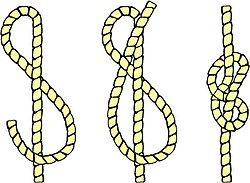
Figure Eight
| Figure Eight |
|---|
|
Use: This knot is ideal for keeping the end of a rope from running out of tackle or pulley.
How to tie:
|
Ring Bend
| Ring Bend (Water Knot, Tape Knot) |
|---|
|
Use: The water knot (or tape knot) is a knot frequently used in climbing for joining two ends of webbing together, for instance when making a sling.
The ends should be left at least three inches long and the knot should be "set" by tightening it with full body weight. The ends can be taped or lightly sewn to the standing parts to help prevent them from creeping back into the knot. Inspect the knot before each use.
How to tie:
|
Double Fisherman's
| Double Fisherman's Knot |
|---|
|
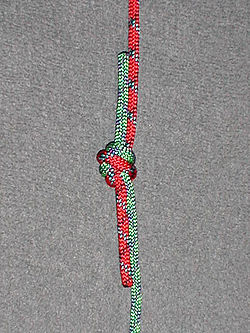
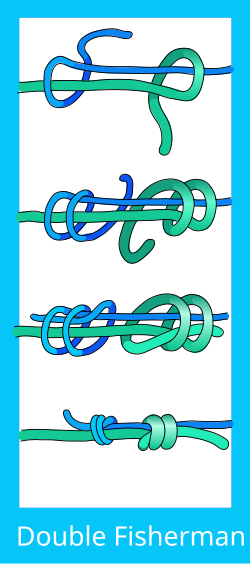
Use: Joining thin, stiff or slippery lines, backing up critical knots such as the Figure-of-eight loop or Figure-of-eight follow through.
Use the double fisherman's knot to tie together two ropes of unequal sizes. This knot and the triple fisherman's knot are the variations used most often in rock climbing, but other uses include search and rescue. The primary use of this knot in rock climbing is to form high strength loops of cord for connecting pieces of the rock climber's protection system. It is favoured for being compact, and for arranging the line of force in a straight line through the knot. Another common use for this knot is to back up a critical knot, such as a harness tie-in knot or single-line rappel rigs. In this use, the running end is tied around the standing end of the rope, so that it cannot slip back through the knot.How to tie:
|
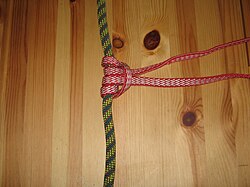
Prusik
4
5
The adjectival grades are as follows:
Easy (rarely used)
Moderate (M, or "Mod")
Difficult (D, or "Diff")
Hard Difficult (HD, or "Hard Diff" - often omitted)
Very Difficult (VD, or "V Diff")
Hard Very Difficult (HVD, or "Hard V Diff" - sometimes omitted)
Mild Severe (MS - often omitted)
Severe (S)
Hard Severe (HS)
Mild Very Severe (MVS - often omitted)
Very Severe (VS)
Hard Very Severe (HVS)
Extremely Severe (E1, E2, E3, ...)
6
7
8
9
10
Figure eight
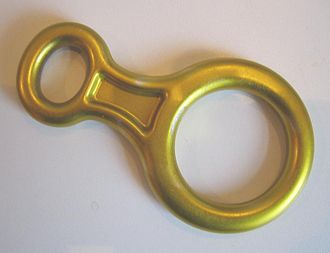
Sometimes just called "eight", this device is most commonly used as a descender, but may also be used as a belay device in the absence of more appropriate equipment.
It is an aluminium (or occasionally steel) "8" shaped device, but comes in several varieties. Its main advantage is efficient heat dissipation. A square eight, used in rescue applications, is better for rappelling than the traditional 8. Because of the "ears" or "wings" on the rescue 8, there is less chance of forming a girth hitch while rappelling very quickly.
Figure eights allow fast but controlled descent on a rope. They are easy to set up and are effective in dissipating the heat caused by friction but have a tendency to put a twist in the rope. This twisting only occurs during improper use of the 8. Holding the brake hand off to the side twists the rope, whereas holding the brake hand straight down, parallel to the body, allows a controlled descent without twisting the rope. Because of the many bends it puts into the rope, an 8 descender can wear a rope quicker than a tube style belay/rappel device. Many sport climbers also avoid them because of the extra bulk an 8 puts on the rack. However, many ice climbers prefer to use the 8, because it is much easier to thread with stiff or frozen rope.
Rescue eight
A rescue eight is a variation of a figure eight, with "ears" or "wings" which prevent the rope from "locking up" or creating a girth hitch, thus stranding the rappeller on the rope. Rescue eights are frequently made of steel, rather than aluminum.
