Respuestas para la especialidad JA de Fogatas y cocina al aire libre usados por la Asociación General
Nivel de destreza
2
Año
1956
Version
12.02.2026
Autoridad de aprobación
Asociación General
1
Tenga en cuenta que el requisito es "poner" estos fuegos, y que "encenderlos" es opcional. Es posible que desee que sus Conquistadores los coloquen todos y luego enciendan solo uno. Esto le permite colocarlos todos en el mismo lugar sin tener que lidiar con brasas o tener que atender varios fuegos a la vez.
Fogata del cazador
El fuego del cazador es un fuego para cocinar. Los troncos en la parte superior están espaciados lo suficientemente juntos como para que se pueda colocar una olla, una sartén o un horno holandés sobre ellos. Trate de colocarlo lo más nivelado posible.
Fogata reflector
Este fuego se puede usar para hornear, aunque no es tan eficiente como un horno reflector (que tiene una superficie reflectante metálica y, a menudo, rodea el artículo). El fuego en sí puede ser de cualquier otra forma y se coloca frente al reflector. . El artículo que se va a hornear se coloca entre el reflector y el fuego. Este fuego también es bueno para calentarse. El reflector también puede ser una piedra grande. Si se sienta (o duerme) entre el reflector y el fuego, el lado de frente al fuego se calentará directamente, mientras que el reflector arroja calor al lado opuesto muy tostado.
Si se fabrica el reflector con troncos, los miembros verticales deben hundirse profundamente en el suelo para soportar el peso de los miembros horizontales. También puedes usar rocas para apoyarlos.
Fogata estrella
La ventaja de este fuego es que los troncos pueden ser de cualquier longitud, evitando la necesidad de trocearlos. A medida que los extremos de los troncos se queman, son empujados hacia el fuego. El fuego se enciende en el centro de la estrella. Si los troncos están apoyados en el anillo de fuego, la gravedad los alimentará a medida que se queman.
Fogata Tipi
La fogata tipi es probablemente la fogata más reconocida. Sin embargo, es algo difícil de colocar, ya que hacer que los troncos se equilibren entre sí puede ser complicado. A veces, la pila de troncos se caerá y volcará la leña y la yesca debajo, y tendrás que empezar de nuevo desde cero. Si es necesario, puede atarlos juntos en la parte superior con una cuerda (pero no use una cuerda sintética como nailon o polipropileno). Una vez colocado, el fuego tipi es muy fácil de encender, ya que la convección llevará las llamas directamente al combustible.
Agregar combustible al fuego de un tipi también puede ser un desafío ya que el problema del equilibrio sigue ahí, pero ahora se complica por la presencia de calor. Por esta razón, los incendios de tipis a menudo se convierten en un montón caótico.
Fogata de cabaña
La fogata de cabaña es fácil de colocar y también es bastante estable. Se coloca de manera muy parecida a una cabaña de troncos (de ahí el nombre). Sin embargo, es algo difícil de encender, ya que el combustible está fuera del lado de la yesca y la leña. Cuando arde, cae sobre sí mismo, confinándose en el anillo de fuego. También es fácil agregar más combustible y mantener un fuego limpio y ordenado.
Fogata concilio
La fogata concilio fue utilizado por los nativos americanos durante sus reuniones (o concilios). Es muy parecido al fogata de cabaña, excepto que se colocan más de dos troncos en cada capa. Tenga cuidado de no colocar los troncos demasiado cerca uno del otro. Deja espacios de al menos una pulgada (2,5 cm) entre cada tronco para permitir que circule el aire. Al igual que la fogata de cabaña la fogata concilio es muy estable y cae sobre sí mismo mientras arde, permaneciendo dentro del anillo de fuego. A diferencia de la fogata de cabaña, la fogata concilio se enciende fácilmente ya que el combustible principal se encuentra directamente encima de la leña y la yesca donde la convección llevará las llamas. Este fuego está caliente y será un buen lecho de brasas para cocinar. También consume mucho combustible. Este fuego a veces también se llama fuego pirámide.
2
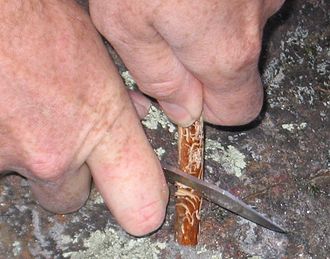
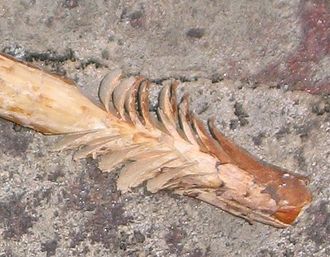
A fuzz stick is a small piece of wood which has had slices cut in the sides to create small shavings. Ideally, the shavings should remain attached to the stick, but if they are accidentally removed, they can still be used. Because the shavings are thin, they are easy to ignite. Because they are attached, they in turn ignite the larger host stick.
To make a fuzz stick safely, choose a piece of dry wood, preferably a dry, dead stick from an evergreen tree. The stick should be about the size of a pencil, or perhaps a little larger. Place one end of the stick against a firm surface, such as a log or a rock, hold the upper end with your left hand, and hold the knife in the right. Carefully slice into the stick with a downward, diagonal motion, maintaining even pressure. Stop before the knife reaches the center of the stick. Take another slice a little higher up, and repeat until the stick is covered with the slices of "fuzz." Turn the stick over and make more shavings on the other side. This is far easier to do with a sharp knife and with a soft wood such a pine, fir, spruce or hemlock. Be sure that you are always slicing away from your fingers. Think at all times about where the knife blade will go if the shaving breaks off, or the knife slips. Make sure that your hand, foot, leg, companions, etc. are not in the path!
Make several fuzz sticks and use them as the first layer of kindling, positioning them atop the tinder. In some cases, the fuzz sticks themselves can be used as tinder.
3
A fire needs three things in order to burn: fuel, air, and heat. You need to pay attention to all three for building a successful fire.
Fuel
Fuel is categorized into three groups: tinder, kindling, and fuel.
Tinder is light, fluffy stuff that is easy to ignite. It may be made of many different types of material, including, dried grass, dead pine needles, fine wood shavings, bird feathers, pocket lint, paper, milkweed seeds etc. The key to tinder is that it should be dry, thin, and wispy. Tinder is laid first, and then it is surrounded with kindling.
Kindling is a bit bigger than tinder. Pencil-sized sticks make excellent kindling, but if all your kindling is that size, you are going to need a lot of it. Sort it by diameter, and stack the smallest stuff over the tinder first, adding progressively larger pieces on top of that. You can arrange it in a tipi, log cabin, or even a ridge-pole and rafter arrangement. As you build up the kindling pile, add larger and larger pieces, but do not add anything with a diameter larger than 1.5 inches through - any bigger than that, and you are into the next size category. Stacking the kindling is perhaps the most important aspect of building a successful fire. If it is stacked too tightly, air cannot circulate and deliver heat from the tinder and it will not ignite. If you do not have enough of it, it will burn out before igniting the main fuel.
Fuel is the largest stuff you're going to burn, though for camping, it should not be larger than six inches in diameter. Any larger than that, and you will either be up all night tending it, or you'll find yourself dousing it before turning in yourself. It is far better to burn all your fuel completely.
Air
It might seem that you would need to do nothing to make sure that your fire has a good air supply - after all, air is all around us. But a fire needs lots of air, and the way the fuel is stacked can affect this greatly Do not pack the fuel tightly. Kindling should be stacked such that the spaces between pieces are equal to the width of the pieces (on average). In other words, the kindling pile should be about 50% air and 50% wood by volume. These gaps will allow the flames to get in between and burn all the kindling, thus igniting the larger fuel logs. When you add logs to the fire, make sure there's at least a one-inch gap between each piece. Otherwise, you will cut off the air supply and the fire will die down without burning all the fuel.
Heat
Heat is initially added to the fuel and air with a match, lighter, or other fire lighting device. If using primitive lighting techniques, the tinder is lit first, and then transferred into the kindling pile. Heat is transferred from the match (or spark) to the tinder, and then from the tinder to the kindling, from the kindling to the main fuel, and finally, the heat from the main fuel will be sufficient to maintain the fire, igniting additional fuel (and sometimes drying it out) as it is added. To get a fire to die down, separate the logs so that their heat is spread out. To burn all the fuel, keep pushing the unburnt ends of logs to the center to concentrate the heat (but do maintain some distance between the logs to allow air in).
4
Again, the secret to keeping a fire going after it is lit, is to stack the fuel progressively from smallest to largest. Be sure you have enough tinder to ignite the kindling, and enough kindling to ignite the main fuel. Keep the stack loose enough to allow air to circulate, but tight enough to allow the heat to reach the next layer in the pile. Stack the kindling atop the tinder and have the main fuel ready to go - but do not add it yet. Light the tinder. As soon as you have a good flame, start adding the main fuel to the fire. Add it in an orderly fashion, using one of the techniques detailed in requirement 1 (the council fire works particularly well for this, as it is easy to lay it and the fuel is positioned directly over the kindling).
5
- Locate the fire in a safe place. It should be clear for 10 feet (3 meters) all around.
- Do not light a fire beneath overhanging branches or tents, shelters etc.
- Do not use accelerants, such as lighter fluid, gasoline, kerosene, etc. Learn to light a fire without these.
- Put the fire out completely before leaving it. If it's too hot to put your hands in the ashes, it's not sufficiently out. Douse it down with water, turn the coals with a shovel, and be sure to extinguish every coal and ember.
- Do not build a fire on top of flammable material such as grass or leaves.
- Cut away the sod (keep it moist so it stays alive, and replace it before your leave), and clear away the duff and litter.
- Keep fire extinguishing supplies handy and near the fire. A bucket of water or sand, or a fire extinguisher are recommended.
- Do not remove burning sticks from a fire.
- Watch for embers that escape the fire pit and extinguish them immediately.
- Wear proper footwear around a fire.
- Be aware that paper, cardboard, and leaves create floating embers that rise out of the fire pit and may land dozens of yards away.
- Do not light a fire when conditions are adverse (high winds, or drought conditions) or when fires are prohibited by law.
6
Once you have found a large, dead limb, it is time to cut it loose and drag it to the campsite. You can do this with either an axe, a hatchet, or a saw. Be sure you have firm footing before swinging an axe or a hatchet, and be sure no one is within six feet of you to the sides or to the rear, and within twelve feet of you towards your front. Axe heads have come off before (2 Kings 6:5), and they are very dangerous when they do. For this reason, it may be better to use a saw. A saw will also leave more of the wood intact with the log for burning rather than as wood chips that fly all over the place.
If you need to chop a log in half, do not lay it directly on the ground. Otherwise the axe blows will push the log into the ground. Instead, lay it on another small log (three inches in diameter is good). Strike the log to be cut at the point where it is in contact with the supporting log. Otherwise, the log may flip up and strike you or a bystander. This can cause a serious injury, so be watchful. Again, it is better to use a saw.
Unless the log you wish to split has been sawn and has a flat end, it will be very difficult to split it. Steady it on its end, and make sure it can stand on its own. Instruct everyone to clear away from you, and do not swing the axe if anyone is near. Grip the end of the axe handle with both hands, and gently lay the blade of the axe on the top of the log, on the edge nearest where you are standing. Fully extend your arms when you do this, and back up if necessary. Spread your feet apart by about the same distance as your shoulders are wide, and make sure your footing is firm. If you are right-handed, slide your right hand towards the head of the axe as you draw it towards yourself. Take aim, and draw the axe over your head, bringing it down mightily as your right-hand slides down the handle. The right hand should meet the left about the same time the axe strikes the log. Note how the axe strikes the wood farther away from you than where you were resting it at the beginning. This is why you should aim for the edge nearest you. If you overshoot the log, you will bring the handle down on the edge of the log and damage the axe. Do that enough, and you'll need to replace the handle.
When splitting a log, try to divide it into two equal masses. If you try to split off a smaller segment, the split will run out, and the piece you remove will be smaller on one end than on the other.
To split a small piece of wood (less than 10 cm![]() in diameter), place the blade of a hatchet on the end of the log, raise the log and the hatchet together, and bring them down sharply on another log or a rock. When they strike the second log, the hatchet's momentum will drive it into the log. Raise the pair again, and strike repeatedly until the log splits apart. Do not steady the log with one hand and strike it with the other. If you miss the log and hit your hand, you will cause an unnecessary emergency.
in diameter), place the blade of a hatchet on the end of the log, raise the log and the hatchet together, and bring them down sharply on another log or a rock. When they strike the second log, the hatchet's momentum will drive it into the log. Raise the pair again, and strike repeatedly until the log splits apart. Do not steady the log with one hand and strike it with the other. If you miss the log and hit your hand, you will cause an unnecessary emergency.
7
The hardest problem to overcome when trying to build a fire in wet weather is finding dry fuel. Even in the wettest weather, dry fuel can be found by splitting open a log and taking the wood from the center of it. You can get both your kindling and your fuel from this source. Another place to find dry fuel is on the underside of dead branches - especially those still on a tree.
Before you begin gathering your fuel, you will need to set up a dry place to store it as you collect it. A tarp can be used for this if you lay it out on the ground, place the wood on it, and fold the tarp over it. This will keep the wood off the wet ground and keep rain off it as well. If it is windy, you should place a few rocks on top to hold down the tarp.
Once you have your fuel, you can begin gathering tinder. If you have some with you, you're good to go, but remember, that because your kindling may be slightly wet, you will need more than the usual amount of tinder. If you need to collect it, there are still several options for finding some. Milkweed seed pods are fairly waterproof, and the fibers inside are pretty easy to ignite. Pocket lint is another possibility, but you may have difficulty getting enough of it to light your kindling. You can also make wood shavings from the same wood you're using as kindling. If available, birch bark can be lit even when wet.
Once you have your fuel, kindling, and tinder, you are ready to lay the fire. This is done as with any other fire. You may wish to place a tea candle in the tinder pile as well, as this will help keep things going long enough for the kindling to catch.
Once your fire is lit and the fuel is burning, you can lay wet logs next to the fire to dry them out before trying to use them. The heat from a good hot fire can drive the moisture out of even the wettest logs. You may need to turn them over periodically to dry all sides.
8
Simmering
Simmering is a cooking technique where food is cooked in liquid that is almost hot enough to boil. Simmering allows the outdoor chef to cook foods longer to soften them without overcooking them and without using excess fuel. On a backpacking trip, this is especially important, as fuel is generally carried in the pack (and more fuel equals more weight).
Tough vegetables such as potatoes, carrots, turnips, and dried vegetables (such as beans and peas) are ideal candidates for simmering. Simply fill a pot with water (about half way), and add the vegetables. When the water begins to bubble, back off the heat (turn down a camp stove, or raise the pot higher over an open fire). Soup mixes are also ideal for simmering.
Boiling
Camping foods that are prepared by boiling include:
- Pasta (spaghetti, macaroni, etc.)
- Oatmeal
- Boiled eggs
- Cooked vegetables (carrots, green beans, corn, etc.)
An easy way to make corn on the cob is by putting the husked ears in a clean cooler, adding enough boiling water to cover it, and then closing the cooler. Let it sit for five or ten minutes. The corn will remain hot enough to prevent bacterial growth for half a day or more.
Frying
Foods that are prepared by frying include
- Pancakes
- Scrambled or fried eggs
- French toast
- Vegetarian sausages
- Veggie burgers
- Grilled cheese sandwiches
Bread on a stick
First you will need a bed of coals. If you attempt to bake your bread over a flame, it will be burned on the outside and raw on the inside. Make the bread dough or bring a frozen tube of pre-made dough. Get a straight stick 100-130cm![]() long and clean the end of it off. You can do this by removing the bark or by washing it in clean water. Wrap the dough in a thin layer around the stick, spiralling it as you go. The dough should cover the top 10-15cm
long and clean the end of it off. You can do this by removing the bark or by washing it in clean water. Wrap the dough in a thin layer around the stick, spiralling it as you go. The dough should cover the top 10-15cm![]() of the stick. Once the dough is secured to the stick, jam the other end of the stick into the ground or support it with rocks or large pieces of firewood, so that the bread is held over the coals. The bread dough should be held at a distance from the coals where it is uncomfortably hot to hold your hand. Turn the stick every couple of minutes until the outside is golden brown (this is why you need a straight stick). You can eat the bread right off the stick. This is an excellent early morning activity while everyone is trying to warm up around the fire. It works equally well at night.
of the stick. Once the dough is secured to the stick, jam the other end of the stick into the ground or support it with rocks or large pieces of firewood, so that the bread is held over the coals. The bread dough should be held at a distance from the coals where it is uncomfortably hot to hold your hand. Turn the stick every couple of minutes until the outside is golden brown (this is why you need a straight stick). You can eat the bread right off the stick. This is an excellent early morning activity while everyone is trying to warm up around the fire. It works equally well at night.
Aluminum foil baking
There are many foods that can be wrapped in foil and dropped into a bed of coals for cooking, but potatoes spring to mind immediately. Corn on the cob is also very good. Simply wrap them in foil, place them in a bed of coals, and take them out after a while. It's that easy.
A tasty dessert can be made by coring an apple, stuffing it with non-gelatinous marshmallows and a few pieces of cinnamon candy (such as Red Hots), wrapping it all in foil, and placing it in a bed of coals. Take it out after about 15 minutes and check that the marshmallow has melted. If it has, the apple is ready to eat.
You can also wrap vegetarian burger, thin slices of potato, carrot, and other veggies in foil. Add a tablespoon of olive oil, a pinch of salt (if desired), some pepper, and some garlic powder, seal, and place it in the coals. Check it after 30 minutes or so. When the potato is soft, it is ready to eat.
Reflector oven baking
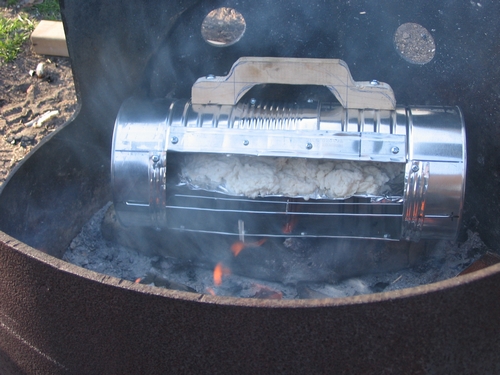
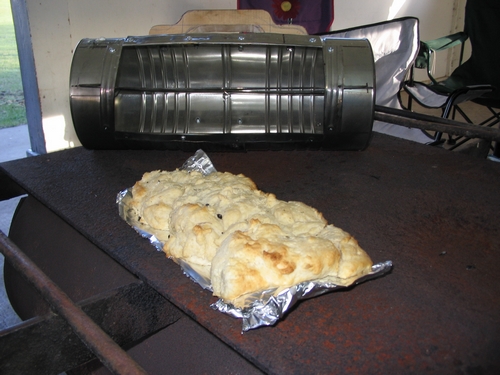
A reflector oven is as simple as a cardboard box lined on the inside with aluminum foil. Run wire through the box to create an oven rack. Make sure the rack is horizontal when the box is placed on its side. Put the box next to a bed of hot coals with the opening facing the heat, but not so near as to ignite the box. Put whatever you wish to bake on the rack. Heat from the coals will bake whatever you put inside the box. There are countless variations on this theme, including the practice of completely removing one side of the box and tilting it at a 45° angle. You can prop the box up with rocks or logs, or build legs into it.
You can also construct an oven out of sheet metal, aluminum flashing, or large tin cans as shown below. This tin can oven was constructed by a Pathfinder leader, and tested by Pathfinders in the field.
9
The most effective way to keep camp food cool on a campout is by storing it in a cooler with ice. Use blocks of ice rather than ice cubes or crushed ice, as it will remain frozen far longer. Solid blocks of ice should easily last for three days. You can buy it at a store or make it ahead of time by freezing water in plastic gallon or half-gallon jugs. You do not need to remove the ice from the jugs. To extend the life of the ice, make sure the cooler's lid is closed all the way and tight-fitting, and do not leave it open any longer than necessary.
One way to keep food cool without ice while on a camping trip is to place the food in a water-proof container, place that in a mesh bag and secure it in a stream or brook. Another way is to put the food in a bag, cover it with several layers of burlap, wet the burlap, and suspend it from a tree branch. As the water evaporates from the burlap, it will cool the food. You have to re-wet the bag occasionally.
10
The most important thing you must remember about storing food on a campout is that it should never be stored in a tent where people will sleep. Animals will smell your food, and if it's in your tent, they will find a way in. Instead, store the food outside the tent.
If you have a vehicle available at your campsite, you may store the food inside, but be sure to seal it tightly. A determined bear can get inside a locked vehicle, and if he decides that's what he wants to do, the car will sustain heavy damage. On the other end of the animal spectrum, are mice, which can also enter a locked car - even the trunk. It is therefore important to seal the food tightly so that the aroma does not draw unwanted attention from unwanted visitors.
If you do not have a vehicle or a trailer in which to store your food, you may place it in a bag and suspend it at least 10 feet (3 meters) above the ground by tying the bag to a rope and hanging it over a tree branch. Black bears can and do climb trees, so make sure the bag is well out of their reach - away from the trunk, and at least 4 feet (1.2 m) below the branch from which it is suspended.
11
Make sure you clean your cooking utensils thoroughly as soon as your meal is over. Raccoons will sneak into a camp full of people distracted by tending their campfire and carry away your utensils so they may lick your ladles clean. The only problem is that they almost never return them. Ants and other insects may not abscond with your gear, but you do not want them crawling all over your spatulas either.
12
- a. Un buen desayuno, almuerzo, cena para una caminata donde el poco peso es importante. La comida no debe ser cocinada, pero debe ser nutritiva.
- b. Las cinco comidas restantes podrán estar compuestas por cualquier clase de comida: enlatados, frescos, congelados o deshidratados. Una de las cinco comidas debe ser hecha en una olla.
Proper Nutrition
The food groups are defined by the USDA in the food pyramid. The amount of each food group needed by an individual varies by age, sex, and amount of physical activity. The chart below shows the recommended amount of each group for Pathfinder-aged people who are fairly active (and it is safe to assume they will be fairly active on a campout).
| Food Group | Grains | Vegetables | Fruits | Milk | Meat & Beans |
|---|---|---|---|---|---|
| 10 year-old Male | 7 oz | 3 cups | 2 cups | 3 cups | 6 ounces |
| 10 year-old Female | 6 oz | 2.5 cups | 2 cups | 3 cups | 5.5 ounces |
| 11 year-old Male | 7 oz | 3 cups | 2 cups | 3 cups | 6 ounces |
| 11 year-old Female | 6 oz | 2.5 cups | 2 cups | 3 cups | 5.5 ounces |
| 12 year-old Male | 8 oz | 3 cups | 2 cups | 3 cups | 6.5 ounces |
| 12 year-old Female | 7 oz | 3 cups | 2 cups | 3 cups | 6 ounces |
| 13 year-old Male | 9 oz | 3.5 cups | 2 cups | 3 cups | 6.5 ounces |
| 13 year-old Female | 7 oz | 3 cups | 2 cups | 3 cups | 6 ounces |
| 14 year-old Male | 10 oz | 3.5 cups | 2.5 cups | 3 cups | 7 ounces |
| 14 year-old Female | 8 oz | 3 cups | 2 cups | 3 cups | 6.5 ounces |
| 15 year-old Male | 10 oz | 5 cups | 2.5 cups | 3 cups | 7 ounces |
| 15 year-old Female | 8 oz | 3 cups | 2 cups | 3 cups | 6.5 ounces |
Trail Meal
Sandwiches, trail mix, and fruit are a good combination of foods that do not require cooking. Powdered milk is another option also not requiring cooking, as are any of the weight-loss milkshakes, however you really do want to bring something with a lot of calories. Peanuts and other shelled nuts are also good as they are high in calories (which are needed on a hike).
One-pot meal
A one-pot meal is any meal that can be cooked entirely in one pot. Often, dehydrated foods are used for this, as they are extremely space and weight efficient. You can buy many dehydrated food packages at an outdoor outfitter, but the selection is limited for the observant Adventist. Many of these foods contain unclean meats (Lev 11) or wine, but there are a few that meet Adventist dietary requirements. If one turns from the outfitters and looks in a grocery store, even more choices are available. Many rice mixes are ideal candidates as one-pot meals (red beans and rice, dirty rice, etc.). Soup mixes also work well, as do pastas, macaroni and cheese, etc.
13
The most obvious things on this list will be the ingredients for the meals - but don't stop there! Inexperienced campers have been known to bring canned foods, but no can openers. An industrious individual may find a way to open a can without one, but it is so much easier (and safer) to open a can with the proper tool. You will also need proper cookware for these meals. A pot will certainly be required (for the one-pot meal), but you will also need something to stir and serve the food with, as well as a plate or bowl from which to eat. Don't forget flatware. If you're planning to cook over an open fire, you'll need something to light it with as well as the needed fire safety gear (fire extinguisher, or a bucket to fill with water at the camp site). Otherwise, you will need a camp stove and fuel. Other items may include a cutting board and a sharp kitchen knife, a Dutch oven, pot holders, and a skillet. But don't just blindly pack all of these items - think first. If you will not need a Dutch oven, leave it behind. Imagine yourself going through all the steps to cook the food - with as much detail as you can - and note what items you'll need.
14
Food safety
There are two key elements to handling food safely: cleanliness, and freshness. Wash your hands before and during cooking. Be aware of the "danger zone" for food - fresh food above 4°C![]() and below 60°C
and below 60°C![]() is in danger of spoiling. Keep it in a cooler, make sure the lid stays on, and make sure it stays cold inside. Use fresh foods early in the camp out, and do not rely on a cooler for more than a day and a half. When all the ice in a cooler has melted, the food inside should no longer be used.
is in danger of spoiling. Keep it in a cooler, make sure the lid stays on, and make sure it stays cold inside. Use fresh foods early in the camp out, and do not rely on a cooler for more than a day and a half. When all the ice in a cooler has melted, the food inside should no longer be used.
Trash disposal
Try not to make more food than your group will eat. Dispose of any leftover food as required by a campground or store it in a cooler. Under no circumstances should food be brought into a tent where people intend to sleep. All food needs to be put away as soon as possible and it needs to be kept out of the reach of wild animals. Skunks, raccoons, and bears can be very clever when it comes to getting food. Suspend your food 10 feet above the ground and at least five feet away from a tree trunk.
Wash your gear
As soon as the meal is over, wash all the dishes and kitchen utensils. Wild critters will be happy to drag your spatula from your kitchen and lick it clean for you, but they rarely return such items, nor do they clean them satisfactorily.
It is a good idea to number all the plates, forks, bowls, knives, spoons, and cups your group owns, and then keep like-numbered items in a hosiery bag. Each camper is assigned a number, and each camper is responsible to clean his own eating gear. If you find an abandoned bowl on a picnic table, it is a simple matter to check the number, determine the owner, and convince him to do his part. Once the dishes are washed, they are returned to the hosiery bag and hung on a line to dry. It is also a good idea to number the clothespins with which the hosiery bags are hung, and hang them in order. This is not a much trouble is it sounds, and makes finding your own dish set a snap.
Assign a kitchen crew to for each meal and have that crew cook the food and clean the kitchen gear. Optionally, you can use two crews for this, with one doing the cooking, and the other doing the cleaning.
References
