AY Honor Horsemanship Answer Key
Note
1
2
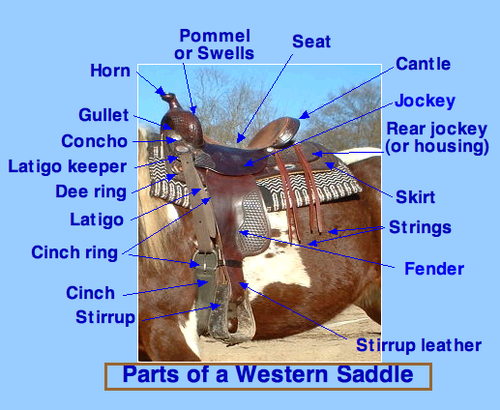
Western
- Fork
- Gullet
- Latigo holder (or latigo holder)
- Latigo
- Front jockey
- Front rigging dee
- Fender
- Hobble strap
- Stirrup leather
- Stirrup
- Front cinch
- Cinch connecting strap
- Flank billet
- Saddle strings
- Horn
- Seat
- Back jockey
- Kirt
- Cantle
- Seat jockey
English
- Tree
- Pannels
- Gullet
- Seat
- Pommel
- Cantle
- Waist
- Jockey
- Knee roll
- Thigh roll
- Illet
- Stirrup
- Sweat flap
3
- Helmet
- Protection of the head. If rider falls from horse, or struck by horse, a helmet will provide some protection if it properly worn. Rider must not be careless around the horse though.
- Boot
- Smooth bottom with heel. In the case the horse bolts and riders' foot slides forward in the stirrup, the heel of the boot will catch and prevent further entanglement.
- Long pants
- It is also a good idea to wear long pants when riding.
4
- Never approach a horse from the backside. A horse can not see you from straight behind and may startle and kick you. Approach from the side or front. Be sure it knows that you are there. If in a stall, knock on some wood softly or whistle, to let him know that you are there.
- Stand to the left side of the horse's head when leading - at the shoulder is too far back. Keep an arms distance away so the horse doesn't step on you.
- If the rope has a chain on the end, hold the rope below the chain. If you were to hold the chain and the horse pulls it through your hand, it can injure your hand. Hold the extra rope in the left hand, figure-eight style. Do not coil or loop the rope around your hand, you don't want to get tangled if the horse bolts.
- When turning right, lean or push into the horse, so it can't step on you as easily. To stop, pull back.
- Avoid excessively long lead ropes, you can become entangled in an emergency.
- Use a quick release knot when tying the horse. Never tie below the horses' withers. Tie to objects that are strong enough to hold if the horse pulls back.
5
- Never go around the back, unless you are at least 3 feet away, or you are very close with your hand on the horse's flank.
- Don't ride when there's lightning, because some horses can be spooked easily.
- Do not run around the horse.
- Don't wrap the reigns or lead rope around your hands because the horse may run and your hands can easily be hurt.
- Never go under the neck of a horse.
- Don't ride a horse in the barn.
- Never sit or kneel while grooming.
- If your horse bolts, turn it in a circle until the circle is small and the horse stops.
- Always use a quick release knot or a panic snap to tie your horse so you can release it quickly if needed.
- Always wear shoes with a heel while riding. No flip flops, or open-toed shoes. Cowboy boots are recommended.
6
7
8
9
10
10a
Always pay attention. Remember that the horse plus you are much taller than just you are, so watch for overhead obstacles. Also the horse is bigger than just you, so you need to choose a path that the horse and you will fit through. Rough ground and rocks can cause the horse to trip and fall so be careful.
10b
When spacing, look between the horse's ears and you should be able to see the legs of the horse in front of you. If not, you are too close. If you are too close you will not be able to stop safely in an emergency.
10c
The bit will get all messy if that happens. Also, you don't know what grows along the trail and if it is good for your horse.
10d
10e
Walking your horse into a group, or when leaving the group, will reduce the chance of spooking other horses and causing other unintended consequences. Do NOT do like you see in the western movies and ride into a group at full speed.
10f
11
The practical part of the honor, and the fun reason we are learning about horses.


